Part 0: What Is Dokko?
The Problem Dokko Solves
Every company has documents — policies, reports, contracts, manuals, product guides, meeting notes. But finding information in those documents is slow and frustrating. You search, you scroll, you read pages looking for one answer. And if a colleague wrote something two years ago, good luck finding it.
Dokko is one platform that lets you ask your documents anything, see when its own answers are weak, and take action through tools you connect to it.
Three capabilities work together to make this possible:
- Answers grounded in your documents. Ask a question in plain language; Dokko searches the content you’ve added and writes an answer using it as the source, with citations to the exact passages it used. Answers stay accurate, traceable, and private to your organization.
- A built-in quality check on the AI itself. Dokko can review its own past conversations and flag responses that look inaccurate or off-topic, along with the documents that produced them. You see exactly what to fix, replace, or add to your knowledge base — closing the loop between AI quality and your content, so the system gets better the more you use it.
- Agents that take action in the outside world. Through configurable AI agents and connected tool servers, Dokko goes beyond answering. Agents can query a database, call an API, run a calculation, look something up on the web, or trigger any external system you give them access to. This is what turns Dokko from a smart Q&A tool into an assistant that can actually get things done.
The Three Core Ideas
1. Your Knowledge Base (the Filing Cabinet)
A Knowledge Base is where Dokko stores and indexes your documents so they become searchable. You add your files — PDFs, Word documents, web pages — and Dokko processes them so their meaning can be searched.
Think of it like a very smart filing cabinet. Instead of finding a document by its folder or filename, you find information by asking a question: “What is our return policy?” or “Who do I contact for IT issues?”
2. Chat (the Smart Colleague)
Chat is the conversation interface. You type a question, Dokko searches your documents, and the AI writes an answer using those documents as its source. At the bottom of an answer you can see Sources — links to the exact documents used.
The key thing to understand: Dokko’s AI answers from what you give it. By default a document-based chat draws only on the documents you’ve added, not the open internet — this keeps answers accurate, relevant, and private to your organization. (An administrator can optionally let a chat also search the web for fresh information — see Web Search in Part 3.2 — but that is off unless someone turns it on.)
3. Agents (the Automated Assistant)
An Agent goes beyond answering questions. Agents can take a sequence of actions: search documents, run calculations, look up external systems, and report back a complete result. Think of an agent as a project manager who receives a complex task, breaks it into steps, and executes each step automatically.
Who Uses Dokko: Your Role
Every person who uses Dokko has a role that determines what they can see and do. When you log in, your role is already set by your Organization Admin.
| Role | Plain-English Name | What They Can Do |
|---|---|---|
| Organization Admin | Full access | Controls everything: users, organization settings, documents, AI, billing of API usage |
| Content Admin | Librarian | Manages documents, repositories, agents, chat interfaces, permissions, and monitoring; can view (but not change) the AI engine setup |
| Session Admin | Support Supervisor | Monitors chat sessions and message logs |
| User | Reader | Can use the chat interface only |
Not sure what your role is? Log in and look at the left sidebar. If you only see “My Chat”, you are a User. If you also see sections like “Knowledge Base”, “Agent Management”, or “Administration”, you have a higher-level role.
Quick-Start Checklist by Role
If you are an Organization Admin, follow this order:
- Log in and explore the Dashboard (Part 1)
- Add your AI provider API keys (Part 3.1)
- Create LLM configurations (Part 3.2)
- Create a repository, then add documents or crawl a website (Part 2)
- Set up the chat widget (Part 5.1)
- Invite your team members and assign roles (Part 8.1)
- Test the chat (Part 4.1)
If you are a Content Admin, start here:
- Log in (Part 1)
- Create a repository (Part 2.2)
- Upload documents or crawl a website into it (Part 2.3)
- Configure the chat widget (Part 5.1)
- Test in My Chat (Part 4.1)
If you are a regular User:
- Read Part 1 (logging in) and Part 4 (using chat). That covers everything you need.
Part 1: Getting Started — Your First Login
1.1 Receiving an Invitation
When an Organization Admin adds you to Dokko, you receive an email with an invitation link. The email contains a button or link to set up your account.
Note: Check your spam folder if you don’t see the email within a few minutes.
Click the link. It opens a web page where you set your password.
1.2 Setting Your Password
On the registration page you will see:
- Password — choose a strong password (at least 8 characters; mixing letters, numbers, and symbols is recommended)
- Confirm Password — type the same password again
A password strength indicator shows how secure your password is. Aim for “Strong.”
Your email address is shown but cannot be changed — it is fixed to the address you were invited with.
Click Save. Your account is now active and you are logged in.
1.3 Logging In
Go to your organization’s Dokko web address in a browser. The login page has three fields:
- Organization Name — the name of your company’s Dokko workspace (written in your invitation email)
- Email — your work email address
- Password — the password you created
Click Log In.
Forgot your password? Click the Forgot password? link. Enter your email address and your organization name, and you will receive a password reset email.
1.4 The Dashboard — What You See First
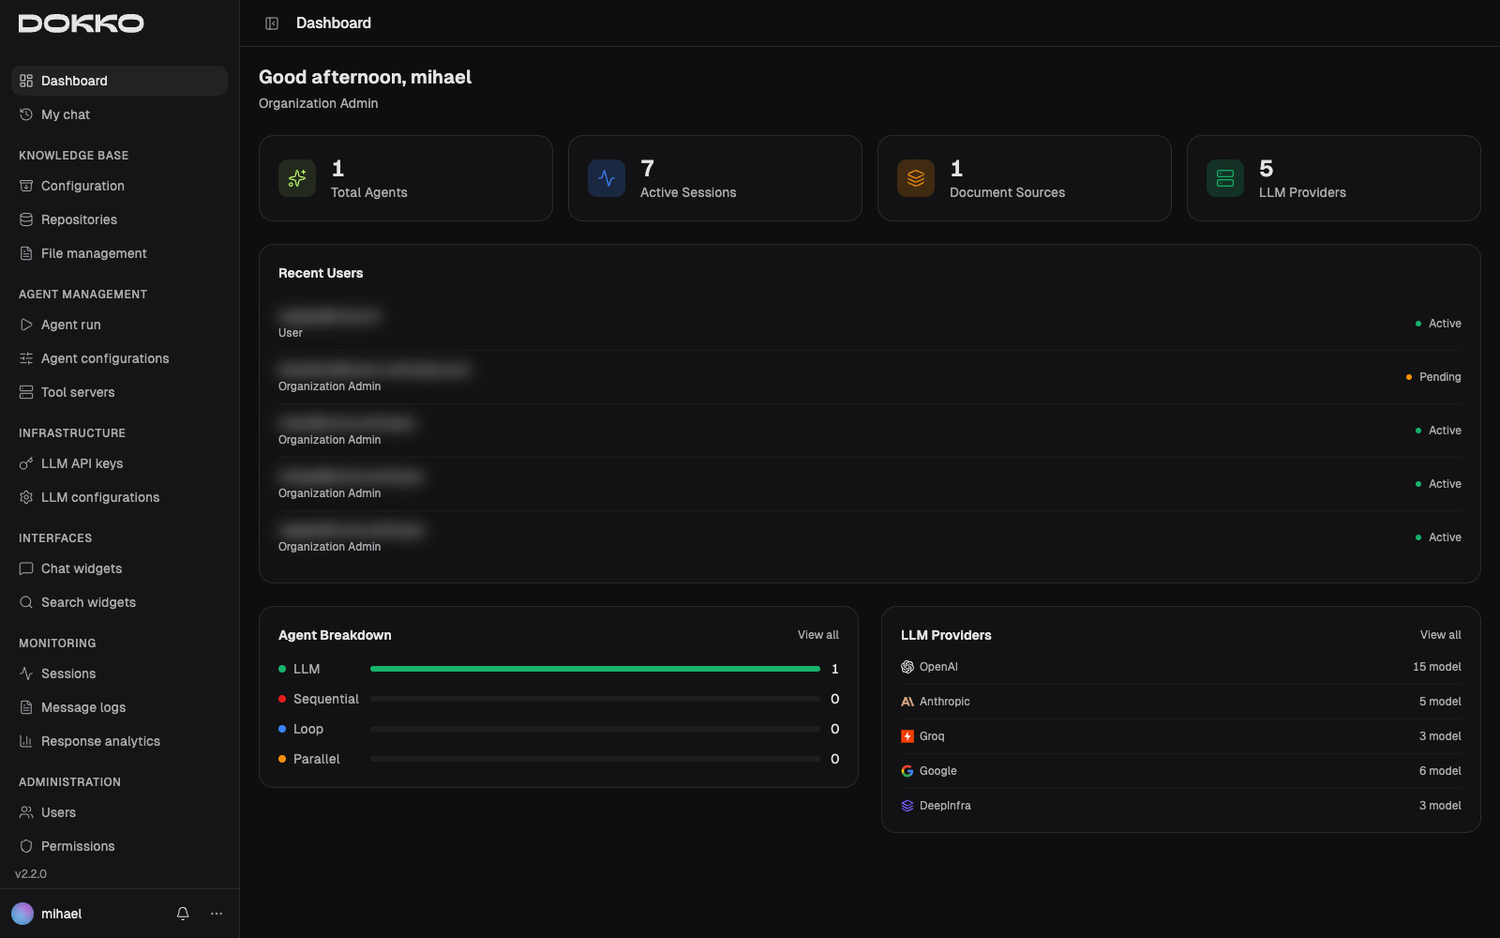
After logging in, Organization Admins and Content Admins land on the Dashboard — an overview page summarizing activity across your organization, such as active sessions, configured agents, and the status of your AI providers.
If you are a Session Admin, you land on the monitoring area. If you are a regular User, you land directly on My Chat.
1.5 The Sidebar Navigation
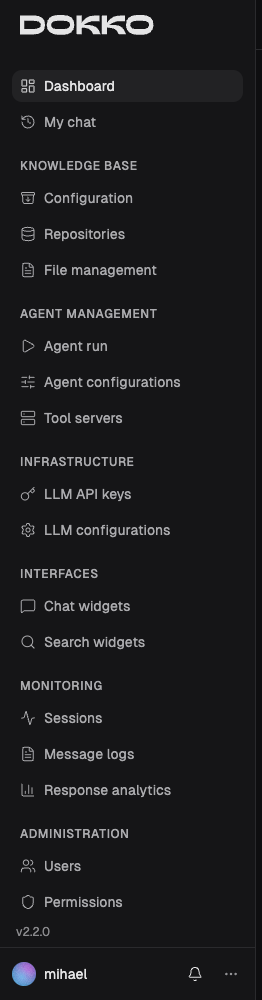
On the left side of the screen is the sidebar — the main navigation menu, divided into groups:
| Group | What It Contains |
|---|---|
| Dashboard | Overview page |
| My Chat | Your personal chat interface |
| Knowledge Base | Configuration, Repositories, File Management |
| Agent Management | Agent Run, Agent Configurations, Tool Servers, Skills |
| Infrastructure | LLM API Keys, LLM Configurations |
| Interfaces | Chat (widget), Search (widget) |
| Monitoring | Sessions, Message Logs, Response Analytics |
| Administration | Users, Permissions, Organization, Service Accounts |
You only see the groups your role allows. A regular User sees only My Chat. An Organization Admin sees everything.
The sidebar can be collapsed by clicking the arrow icon on its edge — useful on smaller screens. Click it again to expand.
At the bottom of the sidebar you will see your account menu and a Logout option.
1.6 Account Settings
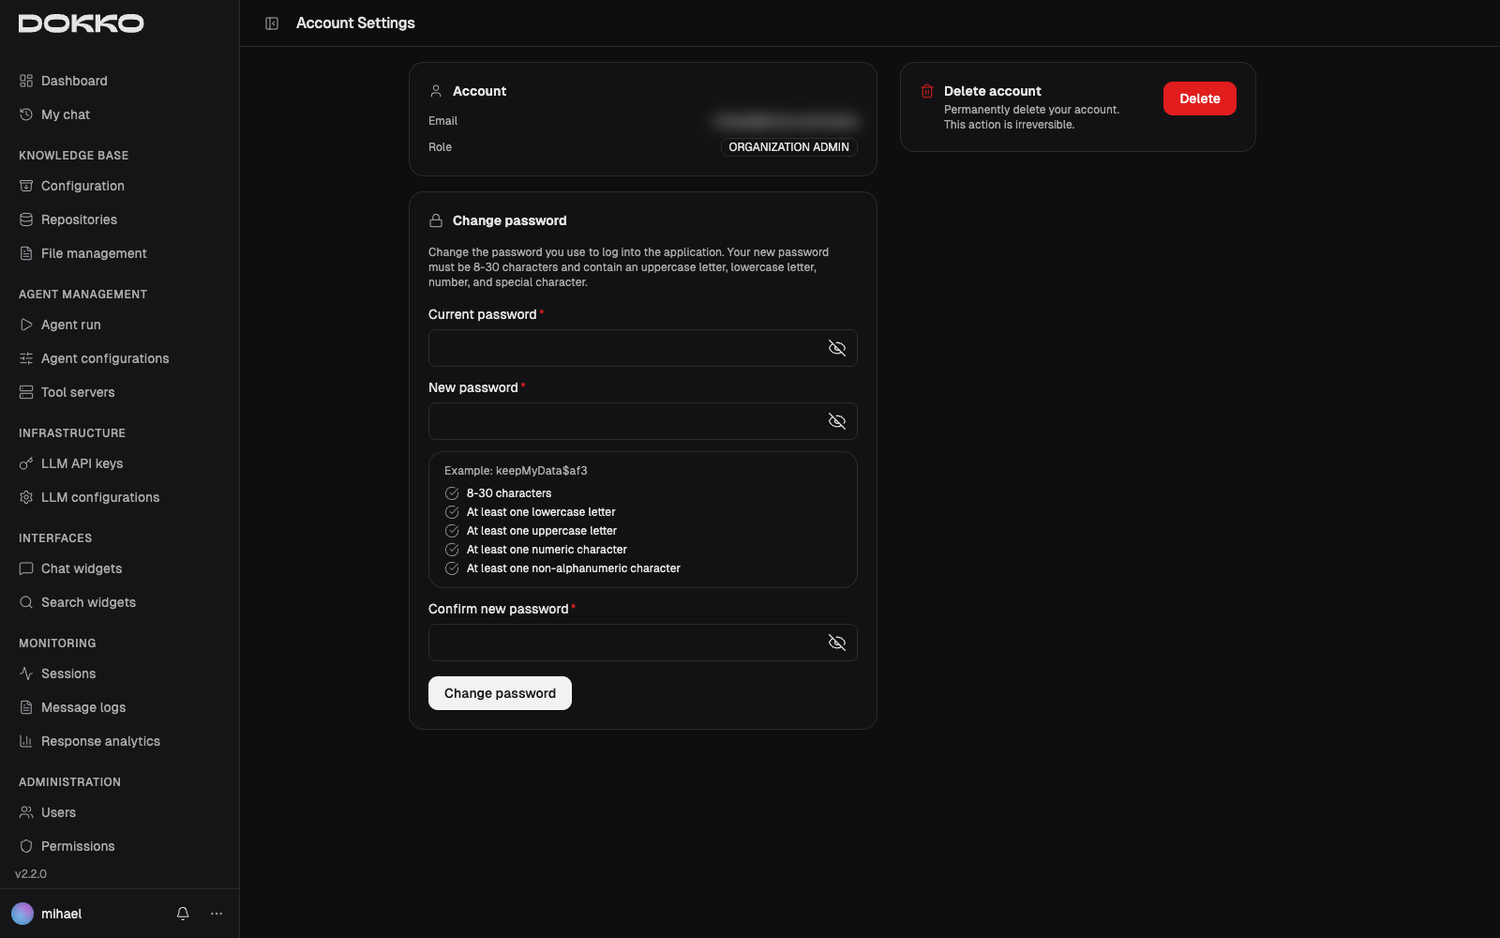
To manage your personal account, open Account Settings from your account menu. There you can see your email and role, and:
- Change your password — enter your current password, then your new password twice, and click Save.
- Delete your account — click Delete Account. For safety, you must type the first part of your email address (the portion before the
@) to confirm.
Warning: Deleting your account is permanent and cannot be undone. You will lose access to all sessions and history associated with your account.
Part 2: Knowledge Base — Feeding Dokko Your Documents
Content Admins and Organization Admins: This section is primarily for you. Regular Users do not manage the Knowledge Base.
2.1 How Your Knowledge Is Organized
Before adding anything, it helps to understand how Dokko organizes your documents. Think of it as a library:
Knowledge Base   (Everything Dokko has indexed for your organization)
└── Repository   (A named collection, e.g., "Legal", "HR", "Product Docs")
    └── Files     (Individual documents, or pages imported from a website)
-
Knowledge Base: Your organization’s overall searchable library. It is set up automatically for your organization, and you tune how it processes and searches documents from one Configuration page (Part 2.4).
-
Repository: A named collection of documents. You can have many repositories — one for “HR Policies”, one for “Product Manuals”, one for “Customer Contracts”, and so on. Repositories are the unit you organize and control access to.
-
Files: The actual documents inside a repository — uploaded files, or pages imported from a website by the crawler.
Why does this structure matter? Access to documents is controlled per repository through Permissions (Part 8.2). This means your sales team only searches sales documents, HR only sees HR policies, and so on. Good organization leads to better, more focused answers.
The correct order is: create a repository first, then add documents to it. (Earlier versions let you “mark a folder as a repository” — that no longer exists.)
2.2 Repositories — Creating a Collection
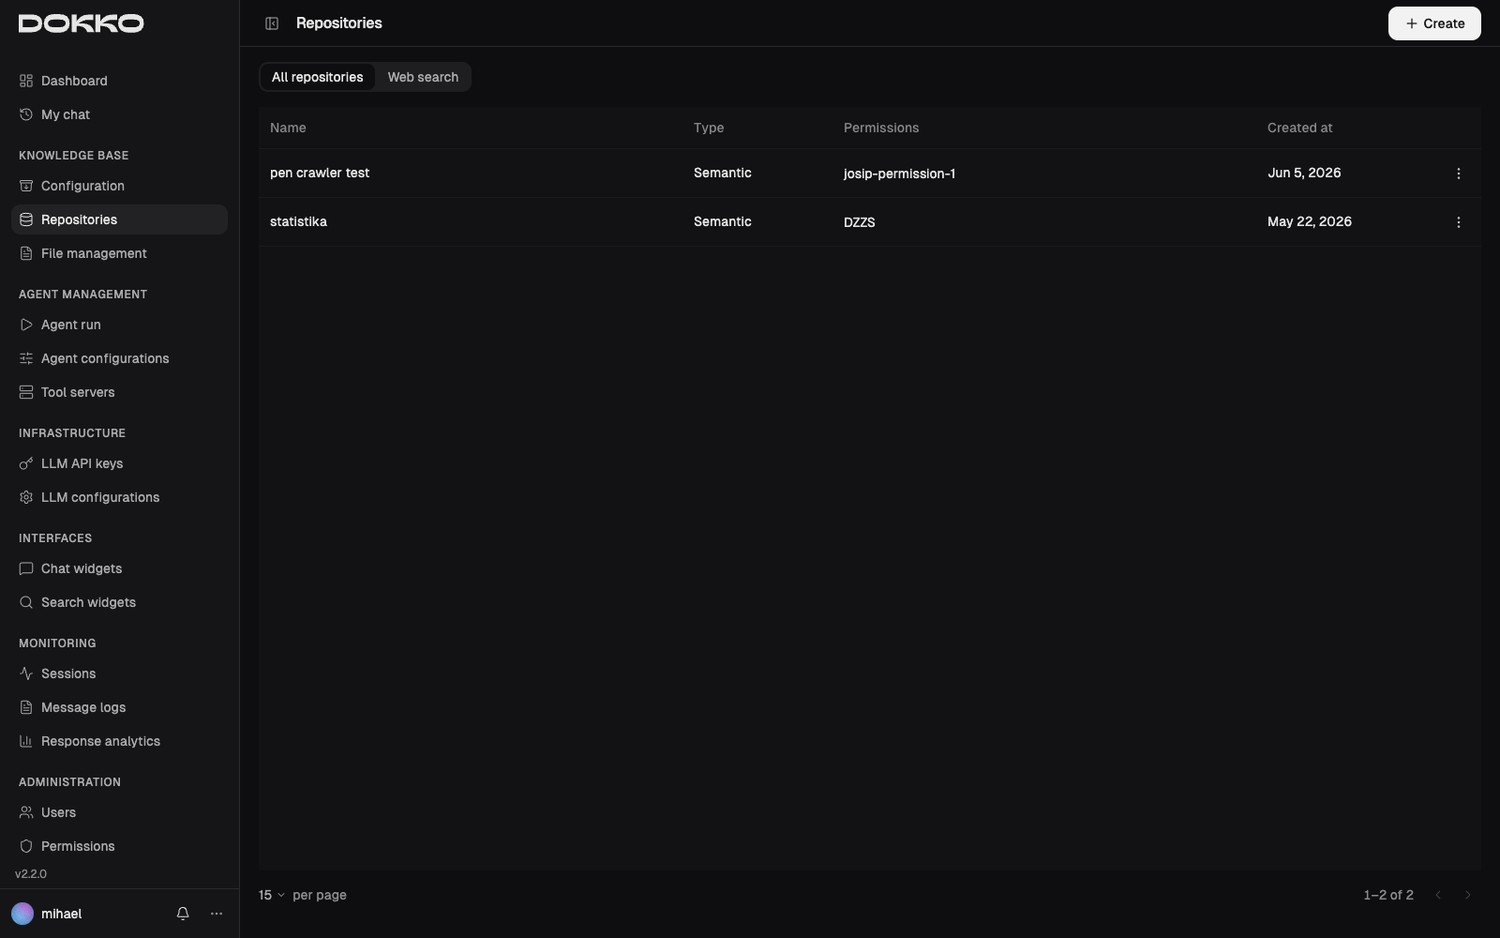
Navigate to Knowledge Base > Repositories in the sidebar.
A Repository is a named collection of documents the AI can search. This is your starting point — you create the repository first, then fill it with content.
Creating a Repository
- Click Create (or the + button)
- Fill in:
- Name: a clear, descriptive name (e.g., “HR Policies”, “Product Documentation”, “Customer FAQs”)
- Type: choose how this collection will be used:
- Semantic — the standard choice. Documents are indexed so the AI can answer questions about them in chat.
- Web Search — a collection geared toward keyword-style search results rather than conversational answers.
- Permissions: select which permissions grant access to this repository. Anyone (a user or a chat widget) holding one of these permissions will be able to search it. See Part 8.2 to create permissions first if you don’t have any yet.
- Click Save
Once the repository exists, add documents to it through File Management — either by uploading files or by crawling a website (see below).
2.3 File Management — Adding Documents and Crawling Websites
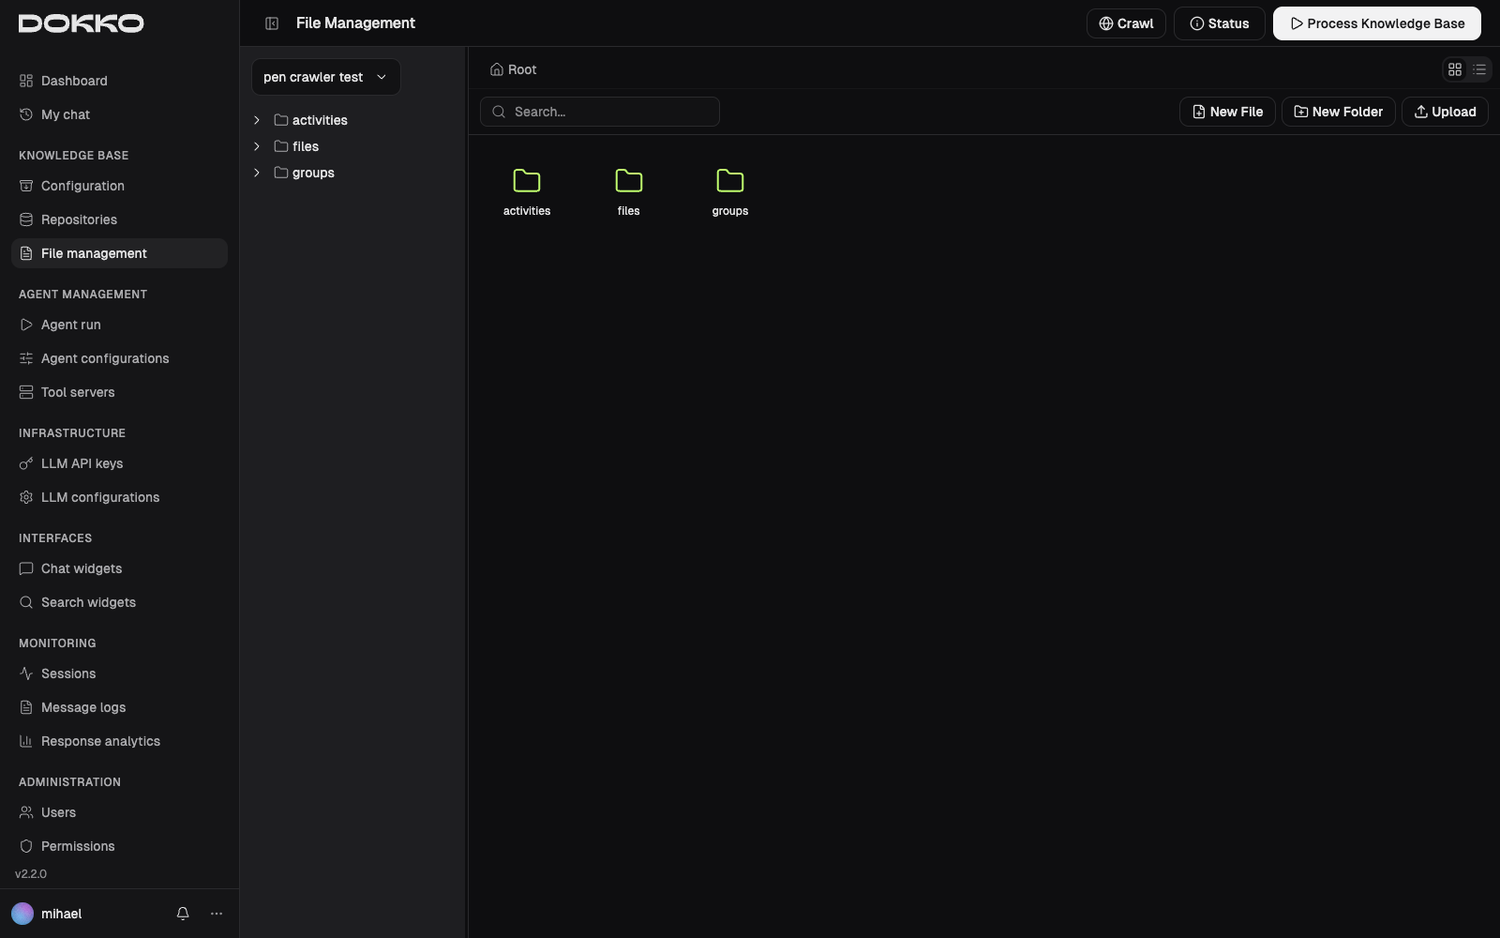
Navigate to Knowledge Base > File Management in the sidebar.
File Management is the document browser for a repository. It always works inside one repository at a time — first select a repository, then you see and manage its files. (If you have no repositories yet, create one first in Part 2.2.)
Uploading Files
- Select the repository you want to work in
- Navigate to the folder where you want to upload (or stay at the root)
- Either:
- Drag and drop files from your computer onto the file browser, or
- Use the Upload action to browse and select files
- You can upload multiple files at once; a progress indicator shows how the upload is going
Supported File Types
Dokko can read and index these document types:
- PDF (
.pdf) - Microsoft Word (
.doc,.docx) - Microsoft Excel (
.xls,.xlsx) - Plain text (
.txt) - CSV (
.csv) - HTML pages (
.html) - Markdown (
.md)
A few limits to know:
- Maximum 50 MB per file. Larger files are rejected.
- Images are not supported (for example
.jpegand.png) — Dokko indexes documents, not standalone pictures. Text and tables inside a supported document are read normally. - For best results with PDFs, use text-based files rather than scanned images (see Part 2.4 for handling complex or scanned documents).
If you upload several files at once and some aren’t allowed, Dokko still accepts the valid ones and tells you, file by file, which were rejected and why (wrong type or too large).
Organizing with Folders
Use the right-click menu (or the toolbar) to create folders, and to rename, move, or delete files and folders. You can also edit a file’s metadata, and edit the contents of text-based files in place.
Warning: Deleting a file removes it from the repository and from search. This cannot be undone. Make sure you have the original elsewhere before deleting.
Crawling a Website
If your knowledge lives on a website or intranet, Dokko can read and import those pages for you. This is called web crawling, and you start it from File Management inside the target repository.
- With a repository selected, click Crawl
- Fill in the crawl settings:
- Starting URL: the web address where the crawler begins (e.g.,
https://help.yourcompany.com) - Crawl Type: the kind of crawl to run (a standard site crawl is the usual choice)
- Maximum Depth: how many clicks deep to follow links — depth 1 is the starting page only, depth 2 also follows its links, and so on. Start with 2 or 3; too deep can import thousands of irrelevant pages. Set it to
-1for no limit. - Included URLs (optional): only crawl pages whose addresses contain these patterns (e.g.,
/docs/) - Excluded URLs (optional): skip pages matching these patterns (e.g.,
/blog/)
- Starting URL: the web address where the crawler begins (e.g.,
- Click to start the crawl
The crawler runs in the background, and the repository is temporarily locked while it works. When it finishes, the new pages appear in the repository and are indexed for search.
Scheduled Re-Crawling
If the website changes regularly, you can have Dokko re-crawl it automatically. In the crawl settings:
- Recrawl Starting Date: when the first automatic recrawl should run
- Recrawl Frequency (days): how often to repeat it
You can turn an existing schedule off again with Disable Auto Recrawl. There’s also a Force Recrawl option to re-import pages even if they were already indexed.
This keeps your knowledge base up to date without manual work.
2.4 Knowledge Base Configuration — Tuning Quality
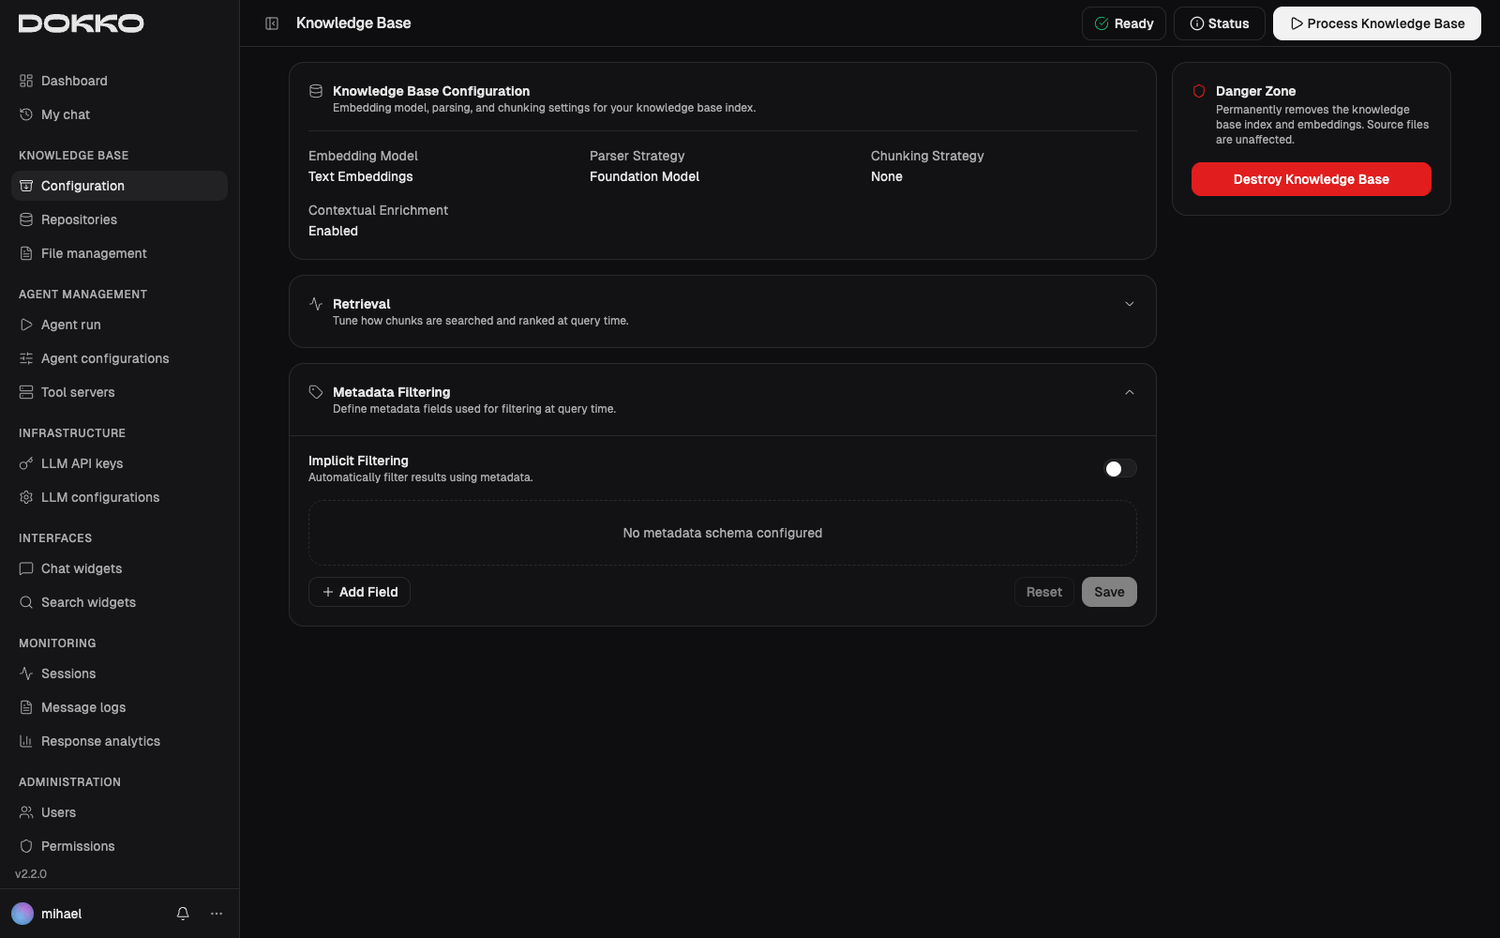
Navigate to Knowledge Base > Configuration in the sidebar.
This single page is where you tune how Dokko processes your documents and how it searches them when answering. These settings apply across your knowledge base. For most organizations the defaults work well — adjust them only when you want to improve results for a particular kind of content.
The page shows a status indicator at the top:
| Status | What It Means |
|---|---|
| Preprocessing | Documents are being prepared |
| Syncing | The searchable index is being updated |
| Ready | Everything is up to date and searchable |
How Documents Are Read
Parsing Strategy — how Dokko “reads” your documents:
| Option | Plain-English Meaning | Best For |
|---|---|---|
| Default | Standard text extraction (free) | Simple text PDFs and plain documents |
| Foundation Model | A more capable reader that understands complex pages (paid) | Documents with tables, diagrams, images, scanned pages, or complex layouts |
How Documents Are Split
Chunking Strategy — how Dokko slices documents into searchable pieces. Think of it as deciding how big each “quote” from your documents can be:
| Option | Plain-English Meaning | Best For |
|---|---|---|
| Fixed Size | Every piece is roughly the same size | Predictable, consistent documents |
| Semantic | Pieces are grouped by meaning, with natural break points | - |
| Hierarchical | Preserves the document’s structure (chapters, sections) | Long structured documents like manuals |
| None | No splitting is applied | Used together with Contextual Expansion (below) |
Contextual Expansion — when enabled, each piece is kept aware of the broader document it came from, so its meaning stays clear even when read on its own. This noticeably improves results, especially for short or ambiguous passages, at a small one-time processing cost. When Contextual Expansion is on, chunking is handled for you (set to None).
How Answers Are Retrieved
These control what Dokko pulls from your documents before writing an answer:
- Hybrid Search — searches two ways at once: plain keyword matching and meaning-based search (finding relevant passages even when different words are used). Recommended for most cases.
- Number of results to retrieve — how many passages Dokko gathers as candidate material for an answer. More can mean richer answers but a bit more processing and token consumption. The usual range is a handful of results; it can go higher when reranking is on.
- Reranking — after the first set of candidates is gathered, a second pass re-scores them for relevance so the best material rises to the top. You can turn it on, and set how many top results to keep. Improves accuracy at a small cost in processing time.
Helping the AI Filter by Metadata
- Implicit Filtering — lets the AI narrow results using your documents’ metadata automatically, based on what the question implies (for example, focusing on a particular document type or category).
- Metadata Schema — define the custom metadata fields your documents carry (a name, a type such as text/number/true-false/list, a short description, and a hint about how it should be used for filtering). This gives the filtering above something concrete to work with.
Note: To change parsing, chunking strategy and contexutal enrichement, you have to re-initalize the Knowledge base (destroy and create new).
Part 3: Infrastructure — Setting Up the AI Engine
Organization Admins: You set up and change the AI engine here. Content Admins: You can view these settings but cannot change them. Regular Users can skip this section entirely.
3.1 LLM API Keys
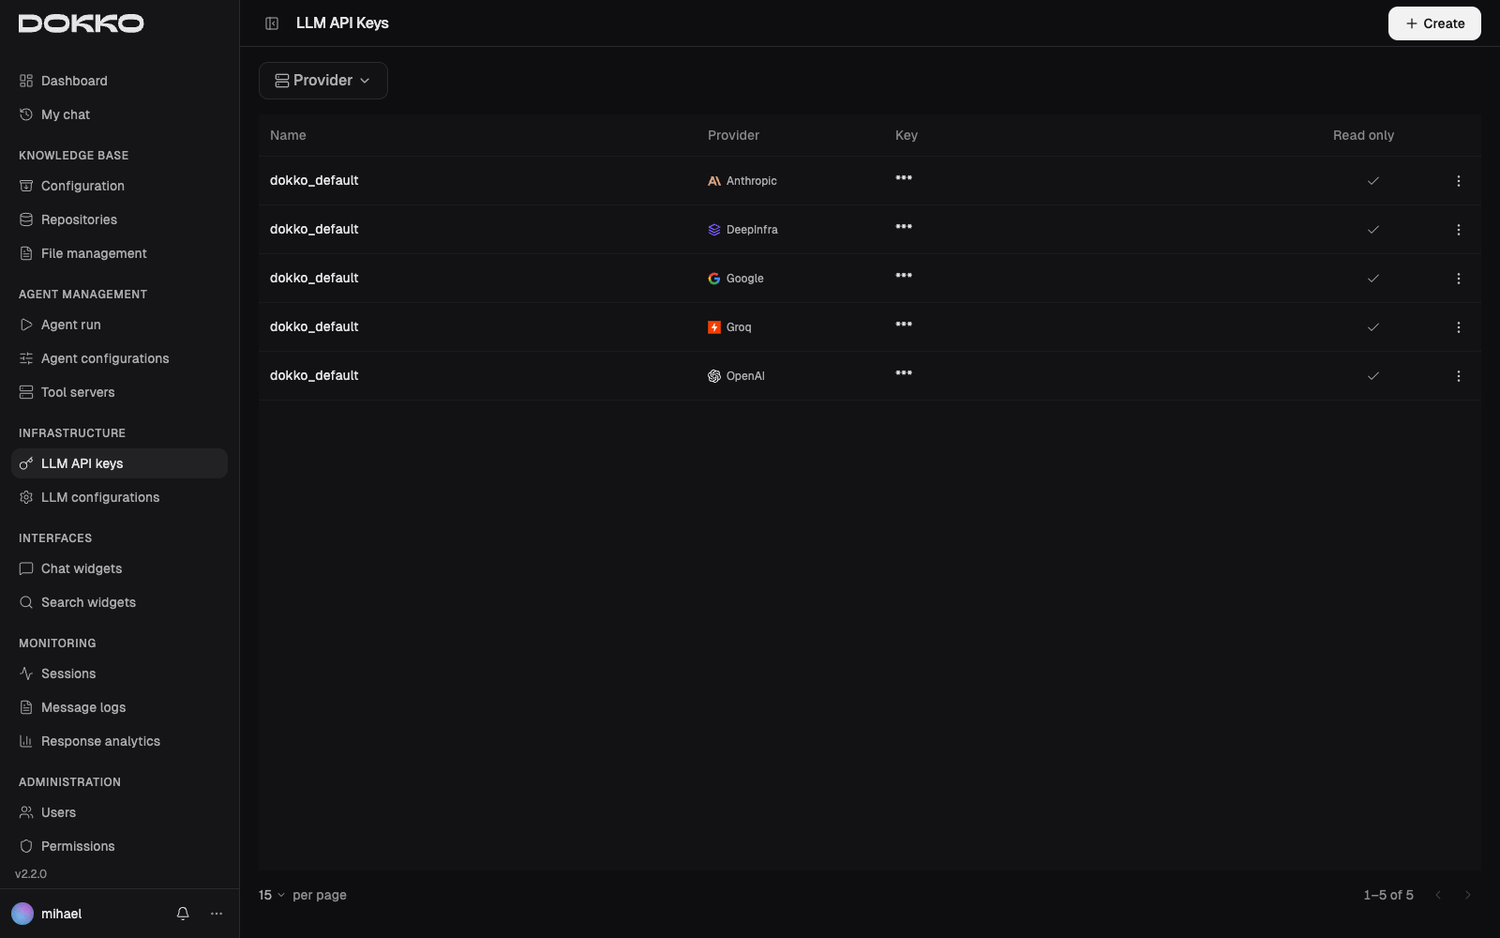
Navigate to Infrastructure > LLM API Keys in the sidebar.
What Is an API Key?
To use an AI model from a provider like OpenAI or Anthropic, Dokko needs permission to use that service on your behalf. That permission comes as an API key — essentially a private password tied to an account with the AI provider.
You don’t have to bring your own keys. Dokko provides built-in default keys for each supported provider, so you can start using the AI right away without signing up with the providers yourself. When you use the default keys, Dokko tracks your usage per provider and bills it according to your subscription tier’s rules. You can still add your own API keys if you’d rather have provider usage billed directly to your own provider account — in that case the provider bills you directly, based on whose key is used.
Supported AI Providers
| Provider |
|---|
| OpenAI |
| Anthropic |
| Groq |
| DeepInfra |
The exact models available depend on the provider you choose and update over time.
How to Get an API Key
- Go to the provider’s website and create an account
- Open their API Keys section (usually under Settings or Account)
- Create a new key
- Copy the key immediately — most providers only show it once
Adding an API Key to Dokko
- Click Create (or Add Key)
- Fill in:
- Name: a label so you remember what this key is for (e.g., “OpenAI Production Key”)
- Provider: select the AI provider
- Key: paste the key you copied
- Click Save
Security note: Dokko stores your API key securely. It is never displayed in plain text after saving.
3.2 LLM Configurations
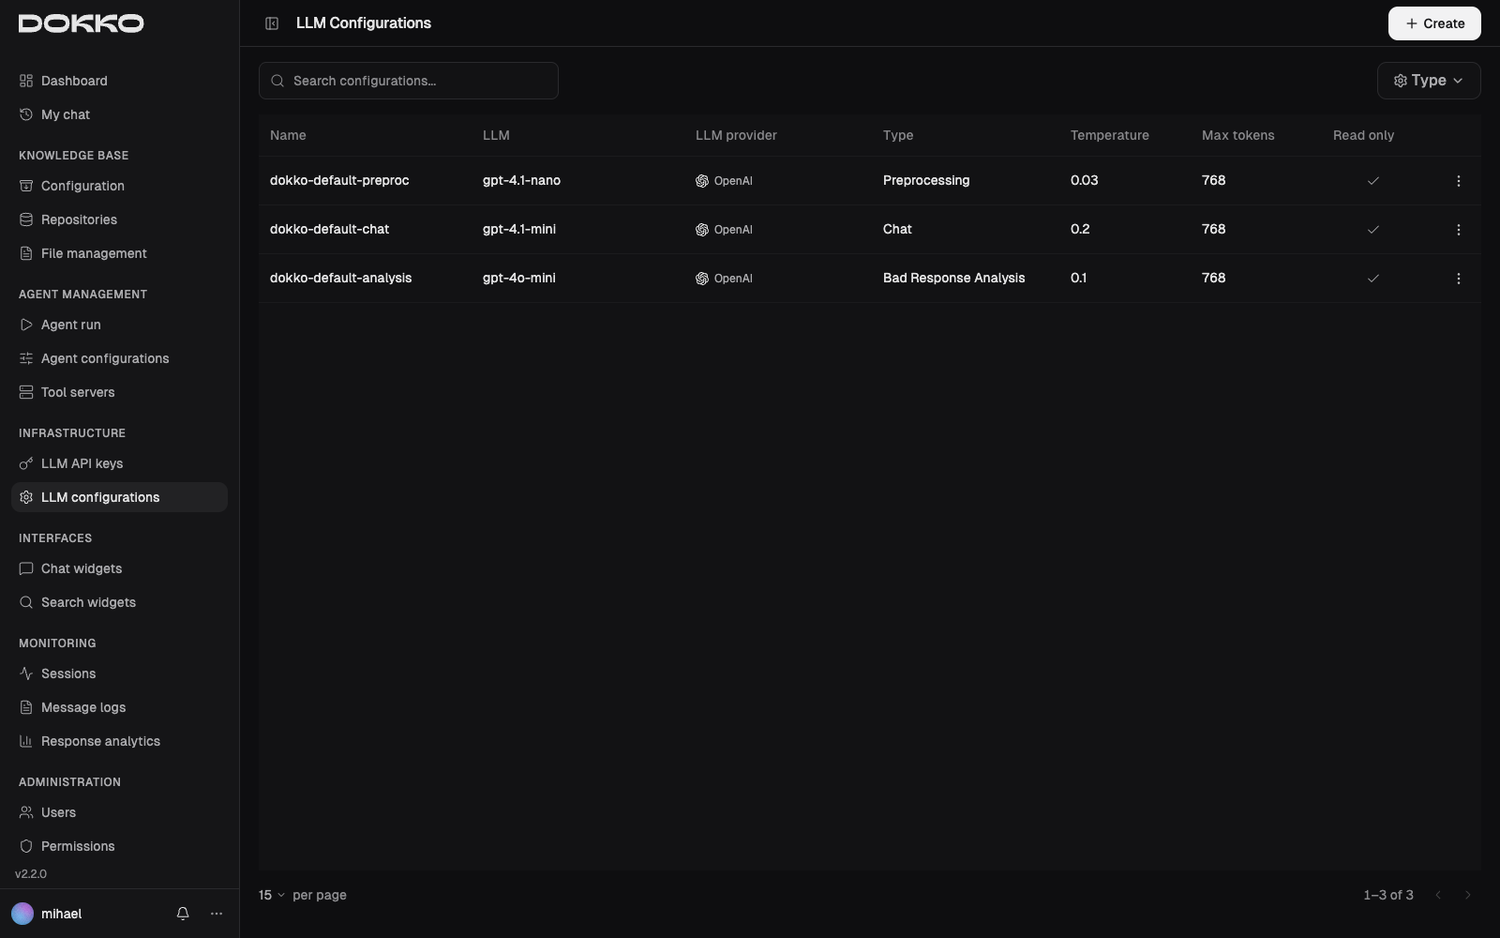
Navigate to Infrastructure > LLM Configurations in the sidebar.
What Is an LLM Configuration?
A configuration is a recipe that tells Dokko which AI model to use, how it should behave, and how its background instructions read. You can create several configurations for different purposes — one for the public chat widget, one for internal use, one for analysis etc.
Creating an LLM Configuration
- Click Create
- Fill in the fields:
| Field | What It Controls | Guidance |
|---|---|---|
| Name | A label for this configuration | Use descriptive names like “Customer Chat — precise” |
| Provider | Which AI provider | Choose one of your configured providers |
| LLM (Model) | The specific AI model | The list is filtered by the provider you chose |
| API Key | Which of your saved keys to use | Filtered to keys for the chosen provider |
| Type | What this configuration is used for | Chat (user conversations), or Bad Response Analysis (used by Response Analytics, Part 7.3). Type cannot be changed after the configuration is created. |
| Temperature | How creative vs. predictable the AI is | 0 = very factual and predictable; up to 2 = very creative/varied. Default is 0.7. |
| Max Tokens | The maximum length of each response | Capped automatically to what the selected model supports |
| Reasoning | How much the model “thinks” before answering | Only shown for models that support it; see below |
| Web Search | Whether the AI may search the web for fresh information | Off by default; see below |
| Prompt Template | Background instructions for the AI (optional) | See below |
- Click Save
Tip on Temperature: For a company knowledge-base assistant that should give accurate, grounded answers, use a low temperature (around 0.0–0.3). Higher values suit brainstorming or creative writing.
The Prompt Template Field — Shaping the AI’s Behavior
The Prompt Template is a background instruction you give the AI, written right here in the configuration. The user never sees it, but it shapes every response. Use it to:
- Set a persona: “You are a friendly HR assistant. Always refer to the company as ‘we’.”
- Restrict topics: “Only answer questions about our products. If asked about anything else, politely decline.”
- Set a style: “Always respond in formal, professional English. Never use slang.”
Leave it blank if you don’t need any special behavior.
Reasoning — Letting the Model Think First
Some newer AI models can reason — spend a moment “thinking through” a question internally before they answer. This usually produces more careful, better-structured answers on complex questions, at the cost of being a little slower.
- The Reasoning setting only appears for models that support it. If you don’t see it, the model you chose doesn’t offer reasoning — that’s normal.
- When it’s available, you pick how much reasoning to apply. The choices depend on the model: typically Off and then increasing effort levels such as Low, Medium, and High (some models offer even higher levels). Higher effort means more thinking time.
- Reasoning is currently offered on the latest OpenAI and Anthropic models. Google (Gemini) reasoning is coming soon.
Tip: For everyday knowledge-base questions, leaving reasoning Off (or Low) is usually fine. Turn it up for genuinely hard, multi-step questions.
Warning — set Max Tokens with headroom: A model’s reasoning counts against the same Max Tokens budget as its written answer. If Max Tokens is set too low, the model can spend the entire budget thinking and run out before it writes anything — leaving you with an empty response. The higher the reasoning level, the more thinking tokens it uses, so give Max Tokens plenty of room (or lower the reasoning level) if you see blank answers.
Web Search — Letting the AI Look Things Up Online
By default, a chat answers only from your documents. Web Search is an optional capability that lets the AI also search the open web when a question needs current or outside information, and cite the pages it used in the Sources section of its answer.
You control it per configuration with a simple mode:
- Off — the AI never searches the web (the default, and the right choice for a purely document-based assistant).
- Automatic — the AI decides, question by question, whether a web search would help, and searches only when it judges it useful. (There is deliberately no “always search” option — searching every time would be slow and noisy.)
When Web Search is set to Automatic, two optional refinements are available:
- Allowed Websites — restrict searches to specific sites (for example
reuters.com,bbc.com). Leave empty to allow the whole web. - Result Detail — how much web content the AI pulls in per search: Low, Medium, or High. Higher detail can improve answers but uses more processing.
Availability: Web Search currently works with OpenAI models. Google and Anthropic are coming soon. The available options (and whether website restrictions apply) depend on the specific model you choose — Dokko only shows what the selected model can actually do.
Part 4: Chat — Talking to Your Documents
4.1 My Chat
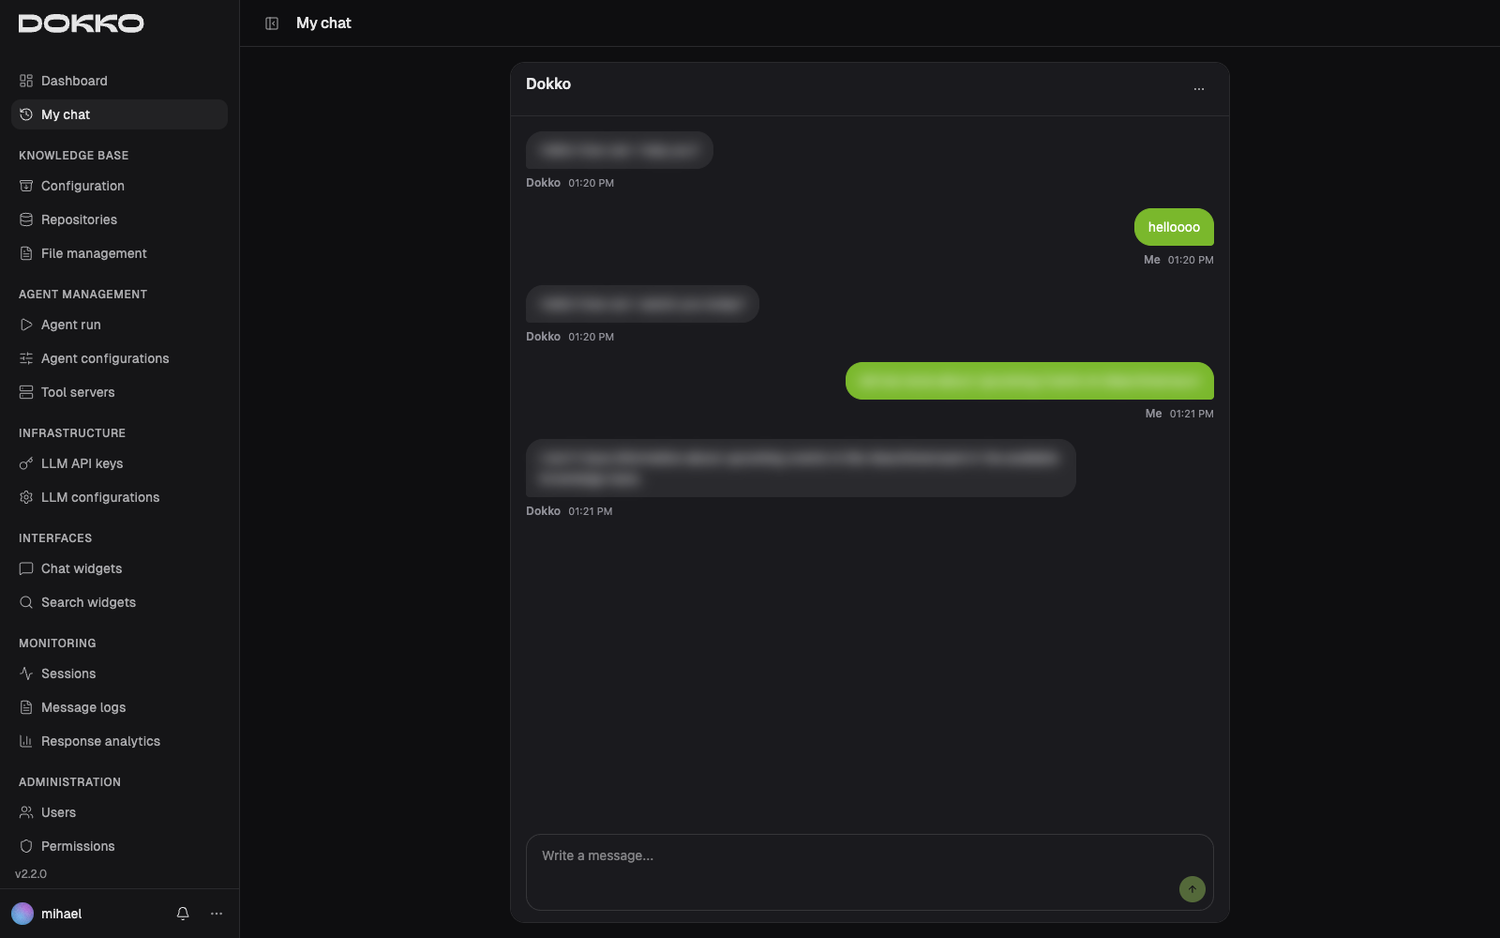
Navigate to My Chat in the sidebar.
This is the main chat interface for asking questions about your documents.
Starting a Conversation
- Click inside the message field at the bottom
- Type your question in plain language — exactly as you’d ask a colleague:
- “What is our policy on remote work?”
- “Who is the contact person for IT support?”
- “Summarize the key points from the Q3 report.”
- Press Enter or click Send
- The answer appears, streamed word by word in real time
Reading the Response
At the bottom of an answer you may see a Sources section — the exact documents the AI used. Click a source to open the original document.
Important: If the AI says it doesn’t have information about something, the relevant documents either haven’t been added yet, or you don’t have permission to access the repository that contains them. Contact your Content Admin.
Continuing a Conversation
Your conversation is saved as a session. Keep typing follow-up questions in the same session and the AI remembers the context — if you asked about “the leave policy” earlier, you can simply follow up with “how many days does it allow?” without repeating yourself.
Managing Multiple Chats
When Multiple chats is turned on (see Part 5.1), you can keep several separate chats and switch between them.
- See your chats. In an embedded chat, your chats are listed in a sidebar. In a floating (popup) chat, the list is a separate view — open it with the arrow in the header, then pick a chat to return to the conversation. Each chat is named after its first message; a new one shows as “New chat” until you send something.
- Start a new chat. Click New chat. A fresh, empty chat opens and your other chats stay as they are.
- Switch between chats. Click any chat in the list to reopen it with its full history and carry on.
- Rename a chat. Open the chat’s ⋯ menu → Rename, type a Chat name, and click Save.
- Delete a chat. In the same ⋯ menu → Delete, then confirm. This permanently removes that chat.
Note: A reply that arrives while you are reading another chat is not lost. A small dot appears on that chat in the list until you open it.
Note: These controls appear only when Multiple chats is enabled. When it’s off, you have a single chat — the header menu’s New session clears the current conversation and starts over. Your chats are private to you; no one else can open them.
Changing the Response Language
You can ask the AI to reply in a different language, right in the chat — just say so in plain words:
- “Answer in German from now on.”
- “Switch to French, please.”
- “Respond in Spanish.”
From that point on, the assistant replies in the language you asked for, for the rest of the conversation. You only need to ask once.
Note: The language changes only when you explicitly ask for it. Writing a single question in another language does not switch the conversation — so the AI won’t change languages by accident.
4.2 Agent Run — Advanced AI Tasks
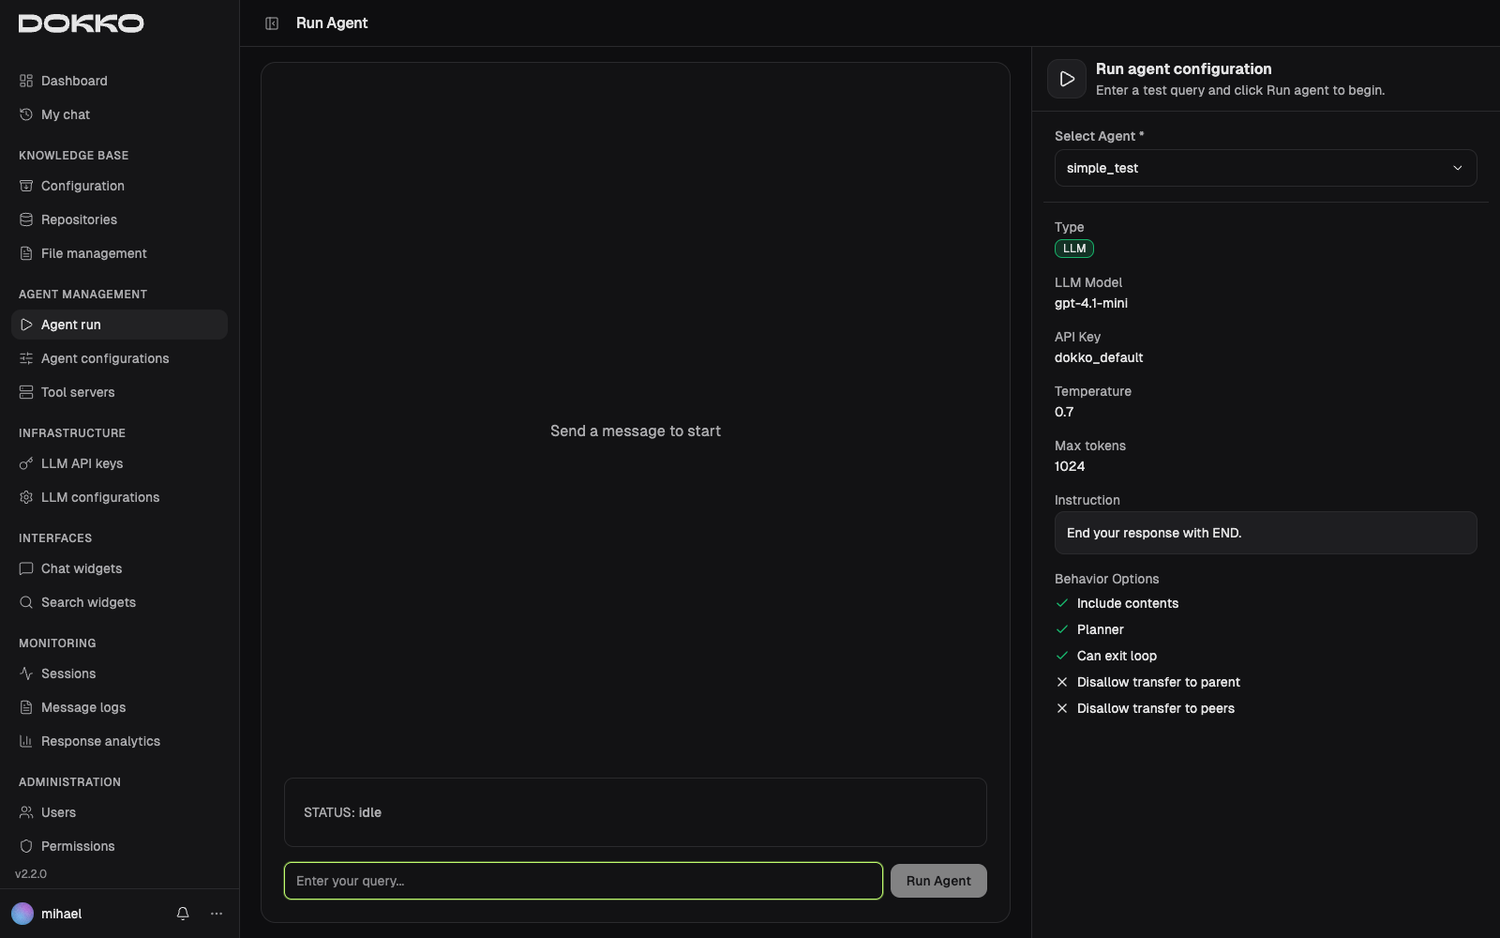
Navigate to Agent Management > Agent Run in the sidebar.
Content Admins and Organization Admins: Agents must be created before they can be run here (see Part 6).
What Is an Agent Run?
Regular chat answers one question at a time. An Agent can handle complex, multi-step tasks — searching multiple sources, performing calculations, looking up external systems, and combining results into a structured response. Think of it as the difference between asking a question and delegating a task.
Running an Agent
- On the Agent Run page, select an agent (its details, such as model and instructions, are shown for reference)
- Type your request in the input field
- Send it
- Watch the agent work in real time:
- You’ll see function calls appear — the steps the agent is taking (e.g., searching documents, running a web lookup, running a calculation)
- Each step shows its result
- Finally, the agent writes a complete response
Part 5: Interfaces — Deploying Chat to Your Website or App
Content Admins and Organization Admins: This section covers deploying Dokko’s chat to your website or internal tools.
5.1 Chat Widget
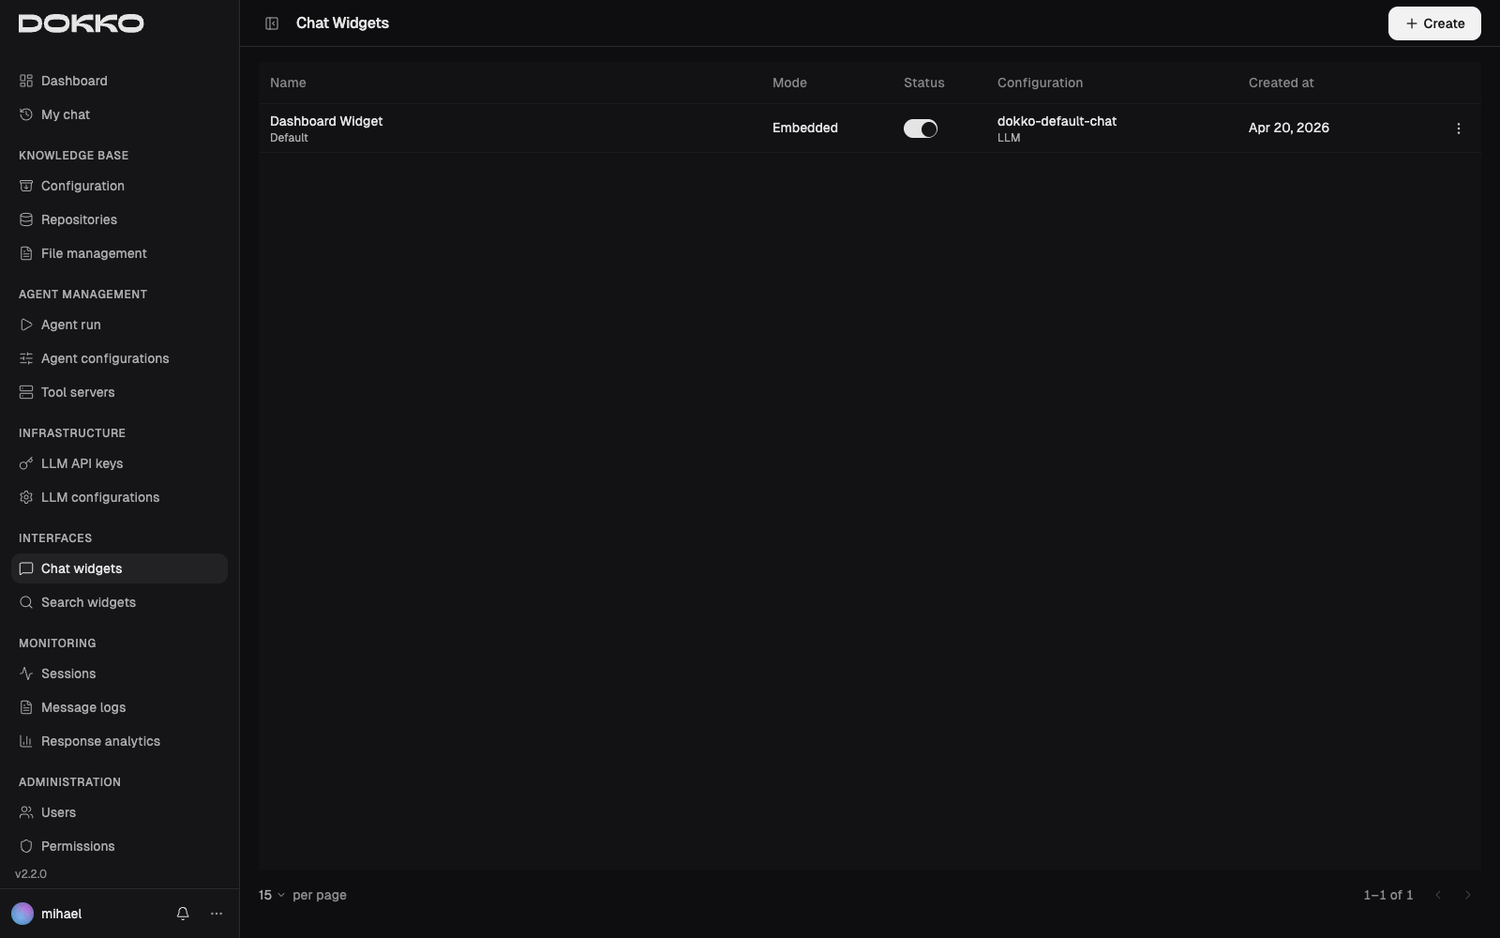
Navigate to Interfaces > Chat Widget in the sidebar.
What Is the Chat Widget?
The Chat Widget is a chat interface you can embed on any website or internal tool. When you create one, you choose its mode:
- Widget — a floating chat bubble in the corner of a page (like a support chat)
- Embedded — a chat panel built directly into a page
This is how you give employees or customers access to the AI without asking them to log into the Dokko dashboard.
Configuring the Chat Widget
A chat widget configuration has two tabs:
Tab 1: General
This controls behavior and content:
| Setting | What It Does |
|---|---|
| Name | An internal label for this configuration |
| Avatar Label | The name shown for the assistant in the chat |
| Language | The interface and LLM language (English, Croatian, or German) |
| Active | Whether this configuration is live |
| Require Login | If on, users must log in before chatting; if off, anyone can use it anonymously |
| Multiple chats | Let visitors keep several named chats and switch between them. Off means one chat per visitor. |
| Keep history | Whether a visitor’s chats stay on their device after they close the browser, and how they agree to it. Shown only when Require Login is off — see below. |
| Keep history for (days) | How long stored chats are kept after the visitor’s last message |
| Powered By | Choose whether this chat is driven by an LLM Configuration (Part 3.2) or by an Agent (Part 6) |
| LLM Configuration / Agent | The specific configuration or agent that answers questions |
| Permissions | Which permissions this widget holds — this determines which repositories it can search (Part 8.2) |
| Include Sources | Whether to show the “Sources” links at the bottom of answers |
| Welcome Message | The first message the user sees when opening the chat |
| Disclaimer | Optional advisory text shown to users (e.g., “Responses are for informational purposes only.”) |
| Header & launcher text | The chat window’s title or logo, plus tooltip and footer text, and whether the bubble starts minimized |
You can use Test Config to try the chat live while you set it up.
Tab 2: Appearance
This controls the look of the widget — colors for the header, message bubbles, input area, and launcher button, with optional dark mode. There’s a handy Generate from Brand Color tool: pick your brand color and Dokko proposes a coordinated palette. A Reset Defaults option restores the standard styling.
Chat History — Keeping Chats Between Visits
By default a visitor’s chat lives only in the open browser tab. When the tab is closed, the conversation is gone. Chat history keeps it on the visitor’s own device instead, so they find their chats again on the next visit. Because this stores data on their device, the visitor must agree to it first.
Open the Chat history section and pick one option under Keep history:
| Option | What happens |
|---|---|
| Off | Nothing is stored on the device. Chats are lost when the visitor closes the tab. |
| Ask in the widget | The chat shows a small History: On / Off button next to the message box. The visitor decides. |
| Ask on my website | Your own cookie or consent banner decides. Your web developer connects it to the chat — see the Embed Code guide. |
Set Keep history for (days) to control how long stored chats survive. The clock restarts with every message the visitor sends. The default is 100 days, and you can set 1 to 365.
Note: With Require Login turned on, the whole Chat history section is hidden. Signing in already covers it: the visitor stays signed in on that browser until they log out, and there is no number of days for you to set.
Note: This setting only controls what the visitor’s own device keeps. Conversations are always stored in Dokko and stay visible to admins under Monitoring (Part 7).
Getting the Embed Code
Once configured, open the Embed Code option to get the code for your website. The dialog offers snippets for plain JavaScript, React, Vue, and Angular — pick your framework, copy the snippet, and add it to your site. For an embedded chat, you also place a small container element where the chat should appear. Copy buttons are provided for each snippet.
Note: You’ll need basic web admin access (or help from your web developer) to add the code to your website.
Automatic Abuse Protection
Any chat widget that allows anonymous use (Require Login turned off) is automatically protected against bots and abuse:
- A quick, invisible proof-of-work check runs in the visitor’s browser before a chat starts. It requires no puzzles or images — most people never notice it — but it makes automated spam far harder.
- Rate limits cap how many chats and messages a single visitor can start in a short period, so one bad actor can’t flood your widget.
There’s nothing to configure: this protection is built in and always on for anonymous widgets, and switches off automatically for login-required widgets (where visitors are already known). It exists to keep your usage and costs under control.
5.2 Search Widget
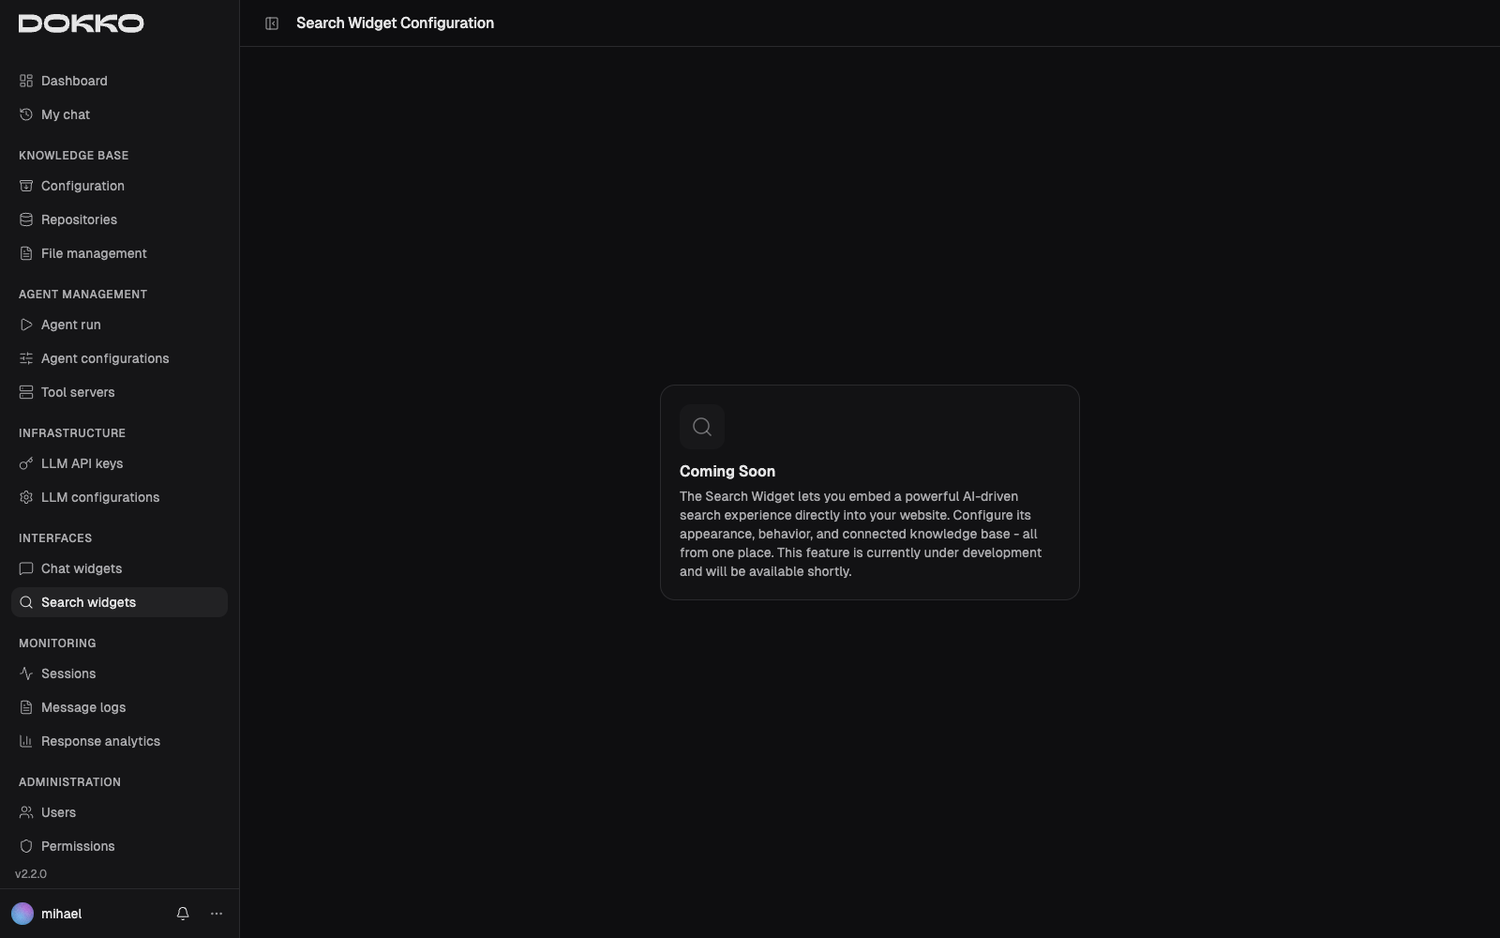
Navigate to Interfaces > Search Widget in the sidebar.
The Search Widget is a search-box interface — more like a traditional search engine than a chat. Visitors type keywords and get back a ranked list of matching document excerpts, each with a title, a short snippet, and a relevance score, rather than a written answer. It’s ideal for “find the page” tasks where users want to browse results themselves.
What It Searches
A Search Widget searches across one or more Web Search repositories (the repository type introduced in Part 2.2). Create those repositories and add content to them first, then point the widget at them.
Configuring a Search Widget
- Click Create
- Fill in:
- Name: an internal label for this search configuration
- Repositories: choose one or more Web Search repositories to search across (at least one is required)
- Number of Results: how many results to show per page (optional; a sensible default is used if you leave it blank)
- Snippet Length: how long each result excerpt can be (optional; defaults to a short preview)
- Click Save
What Users See
When someone types a query into the search box, Dokko returns the best-matching passages from the selected repositories:
- Title — the document’s title (or its folder name, for index pages)
- Snippet — a short excerpt showing the matching text
- Relevance score — how well the passage matches the query
- Link — to open the source document
Results are paginated, so users can page through longer result lists.
Part 6: Agent Management — Automating Complex Tasks
Content Admins and Organization Admins: Agents and skills are powerful ways to extend what Dokko can do. Set them up carefully.
This part covers two ways to go beyond plain question-and-answer: Agents (6.1–6.2), which run multi-step tasks; Tool Servers (6.3), which give agents extra abilities; and Skills (6.4), which teach a normal chat special behaviors and one-off actions.
6.1 Understanding Agents
Agent vs. Chat
| Chat | Agent | |
|---|---|---|
| What it does | Answers one question | Executes a multi-step task |
| Uses tools? | No | Yes — can search, calculate, look up external systems |
| Best for | Q&A, explanations | Research tasks, data gathering, report generation |
Think of Chat as asking a question, and an Agent as delegating a project.
Agent Types
- LLM Agent: A single AI with a job description (its instructions), a chosen model, and an optional set of tools. The basic building block.
- Sequential Agent: Runs several sub-agents one after another, in order — like a pipeline.
- Parallel Agent: Runs several sub-agents at the same time, useful when you need independent pieces of information gathered simultaneously.
- Loop Agent: Repeats a sub-agent until a condition is met or a maximum number of iterations is reached — useful for iterative refinement.
Sequential, Parallel, and Loop agents are built by combining other agents (their sub-agents); LLM agents are where the actual instructions, model, and tools live.
6.2 Creating an Agent
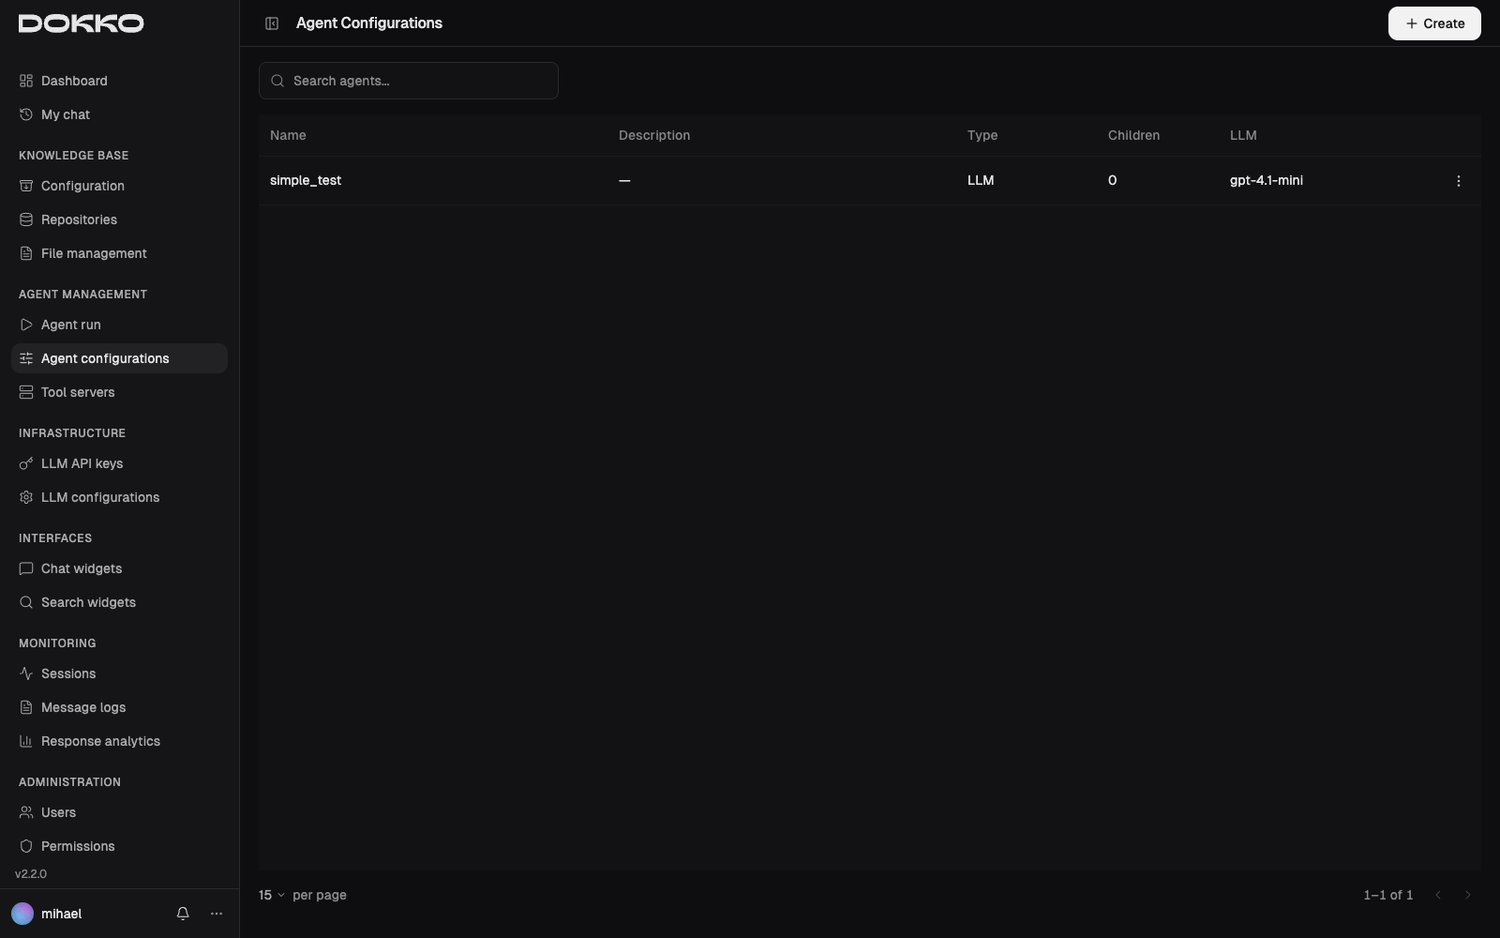
Navigate to Agent Management > Agent Configurations, then create a new agent.
Key Fields
| Field | What It Is |
|---|---|
| Name | A descriptive name (letters and underscores) |
| Description | A brief explanation of what this agent does |
| Type | LLM, Sequential, Parallel, or Loop (see above) |
| Instruction | (LLM type) The agent’s job description — what it should do, how to behave, and what output format to use |
| LLM & API Key | (LLM type) The model and key that power the agent |
| Temperature / Max Tokens | (LLM type) How precise vs. creative the agent is, and how long its output can be |
| Sub-agents | (Sequential/Parallel/Loop) The agents this one orchestrates |
| Max Iterations | (Loop type) How many times to repeat |
LLM agents also offer advanced options (such as additional global instructions and structured input/output) for power users; you can ignore these for a basic agent.
Writing Good Instructions
Instructions are the most important part of an LLM agent. Be specific:
- Vague: “Help with HR questions.”
- Good: “You are an HR policy expert. When given a question, search the HR policy repository, find the relevant policy, and provide a clear answer with the exact policy name and section. Always conclude by advising the reader to confirm with their HR contact for official guidance.”
After saving, test the agent on the Agent Run page (Part 4.2).
6.3 Tool Servers — Adding Capabilities
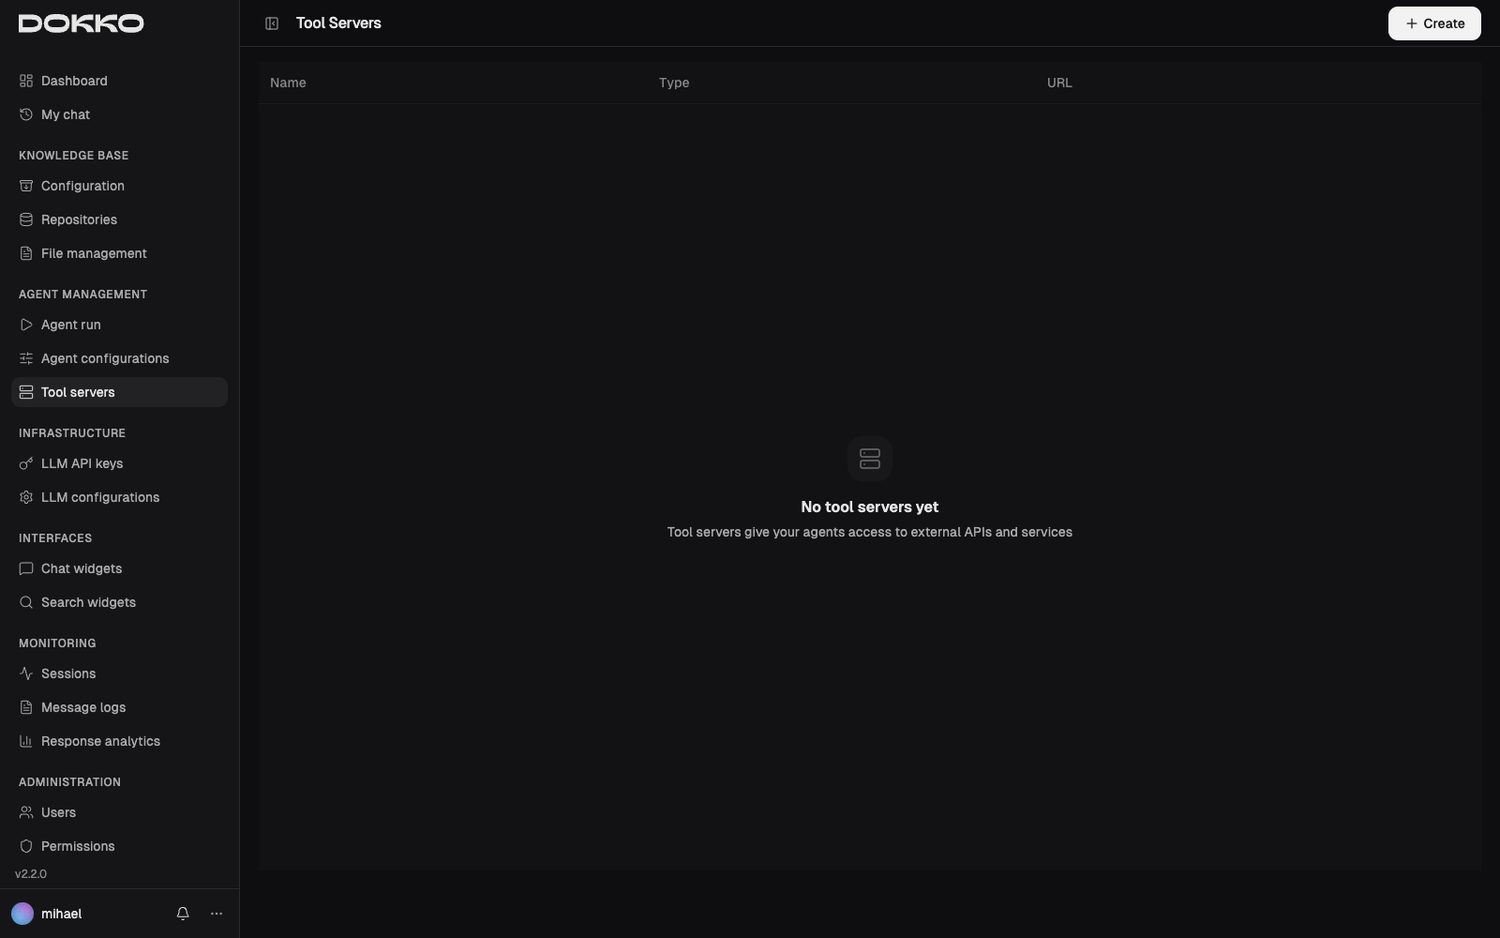
Navigate to Agent Management > Tool Servers in the sidebar.
What Is a Tool Server?
By default, an LLM agent can search your documents and reason about them. You can give agents additional abilities by connecting Tool Servers — external services that expose actions an agent can call, such as:
- A database connector the agent can query
- A web search tool the agent can use to find current information
- A calendar or other business system the agent can check
Adding a Tool Server
- Click Create
- Fill in:
- Name: a label for this server
- URL: the address of the tool server
- Type: the kind of server — MCP (Model Context Protocol) or OpenAPI
- Credentials (MCP): the authentication method (API key or bearer token) and the secret value
- Config (OpenAPI): the server’s configuration details
- Click Save
Attaching Tools to an Agent
Open an LLM agent’s configuration and use its Tool Servers tab to attach a server and pick which of its tools the agent may use. (Only LLM agents can use tool servers.)
Note: Setting up tool servers requires technical knowledge. Involve your IT team if needed.
6.4 Skills — Teaching Chat Special Behaviors
Navigate to Skills in the sidebar.
What Is a Skill?
A Skill is a small set of extra instructions — and, optionally, a one-off action — that a normal chat activates automatically only when it’s relevant to what the user asked.
Think of a skill as an on-call specialist. Most of the time the chat answers from your documents as usual. But when a user’s question matches a skill’s purpose, that skill’s instructions kick in for that answer (and its action runs, if it has one). When the question moves on, the skill steps back.
Some examples:
- A “Returns” skill that, whenever someone asks about returning a product, adds precise step-by-step return instructions and always ends with the returns email address.
- A “Book a callback” skill with an action that files a callback request when a user asks to be called.
Important: Skills only work on chat widgets powered by an LLM Configuration (Part 5.1). They do not apply to chat widgets powered by an Agent — an agent already manages its own behavior and tools.
Creating a Skill
- Click Create
- Fill in:
- Name: a clear name (e.g., “Product Returns”)
- When to Apply: a plain-English description of when this skill should activate — for example, “The user is asking how to return or exchange a product.” Dokko uses this to recognize matching questions.
- Instructions: what the AI should do when the skill is active — the extra guidance, tone, or steps to follow. This takes precedence over the general chat instructions for that answer.
- Trigger Keywords (optional): specific words that should activate the skill instantly (e.g., “refund”, “return”). If a user’s message contains one, the skill activates right away.
- Active: whether the skill is currently live (turn it off to pause it without deleting it)
- Choose where the skill applies:
- All chat widgets (global) — the skill is available everywhere, or
- Specific chat widgets — pick the individual widgets it should apply to
- Optionally attach a Tool (Action) — see below
- Click Save
How a Skill Activates
For each user message, Dokko decides which skills apply:
- Trigger keywords first — if the message contains one of a skill’s keywords, that skill activates immediately.
- Otherwise, by meaning — Dokko compares the message against each skill’s When to Apply description and activates the ones that fit.
If nothing matches, the chat answers normally. Skills are designed to never get in the way — if something goes wrong deciding whether a skill applies, the chat simply falls back to a normal answer.
Tools (Actions) — Optional
A skill can carry a Tool — a pre-built action that does something rather than just answering (for example, submitting a request to another system). When you create or edit a skill, you can pick from the tools that have been set up for your organization; each one describes what it does and what information it needs.
When a skill with a tool activates, Dokko collects the details the tool needs from the conversation (asking the user if anything is missing), runs the action, and reports the result — all within the chat. You can also choose whether the knowledge base should still be searched alongside the action, so the answer combines both.
Note: Skill tools are set up for your organization out of band (they require technical work, like tool servers in 6.3). Once available, they appear in the tool picker when you edit a skill.
Part 7: Monitoring — Understanding Usage and Quality
Session Admins can use Sessions and Message Logs. Content Admins and Organization Admins can also use Response Analytics.
7.1 Sessions
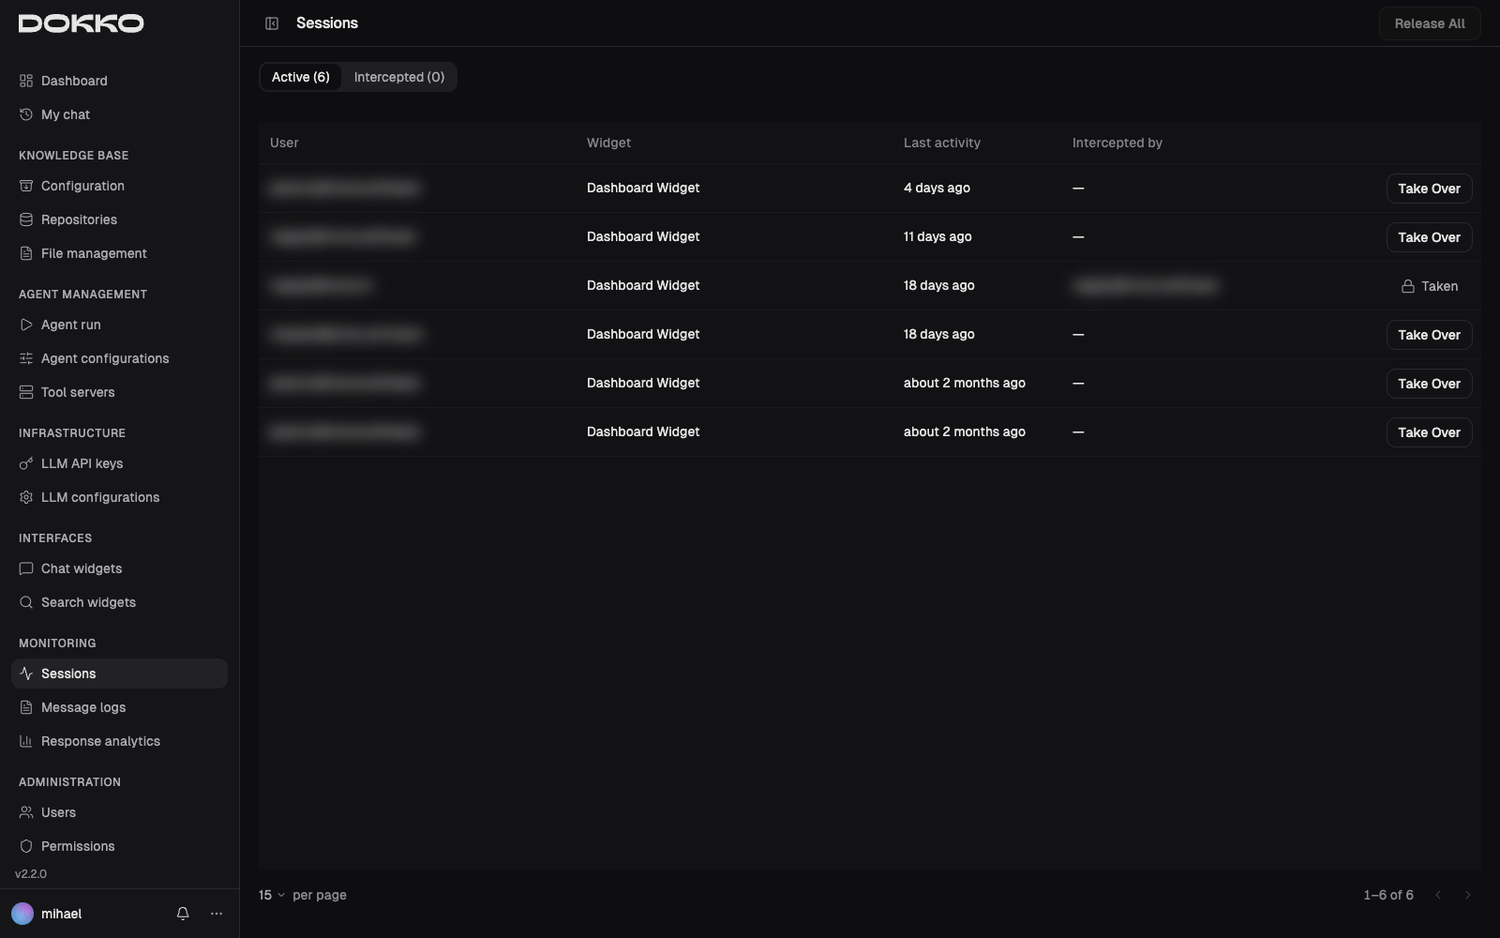
Navigate to Monitoring > Sessions in the sidebar.
What Is a Session?
A Session is one conversation thread — everything a user said and everything the AI responded. A new session begins each time someone opens a chat and starts typing.
The Sessions Page
The page is a single list of your organization’s conversations, narrowed with presets and filters.
Presets give you the common views in one click — Mine, Live, Blocked, All. Change anything by hand and the preset becomes Custom.
For finer control, filter by:
- Activity — All, Live, or Idle
- Intercepted — Yes or No
- Handled by — Me or Anyone
- Blocked — Yes or No
- Widget — which widget the conversation came from
Clear resets every filter.
Each row shows the conversation’s Status — Blocked, or otherwise Live or Idle — plus the Session, who it’s Handled by, the Visitor, the Widget it came from, and Last activity.
Joining a Live Session
Click Take Over on a session to open it. You first see it in a read-only preview; once you take over, you can monitor it in real time and send live responses if needed. When you’re done, click Release (or Release all to release every session you’re monitoring at once).
Blocking a Session
Sometimes a conversation has to be stopped — a visitor is flooding the widget with spam, or turning abusive. Blocking freezes that conversation for the visitor while leaving it fully readable for you.
You can block from a row’s action menu in the list, or from the header of an open session panel. Click Block and Dokko asks you to confirm:
- Category (required) — Spam, Abuse, or Other.
- Note (optional) — context for other admins.
The dialog states the effect plainly: the visitor loses the ability to send messages, rename the chat, delete it, and read its history.
What a Blocked Visitor Sees
A blocked conversation is frozen, not deleted. In the widget it is tagged Blocked and shows a notice — “This chat is blocked. You cannot send messages or read the history here.”
The visitor can still start a new conversation: blocking applies to one conversation, not to the person. (On widgets that don’t offer multiple chats, the notice includes a New chat button so they can begin a fresh one.)
Blocking never limits you. Admins keep full access to a blocked conversation, including its complete message history, so you can review what happened after the fact.
Unblocking
Click Unblock on the row or in the session panel. Dokko confirms first, reminding you what the chat was blocked for. Unblocking clears the block completely — reason and internal note included — and the visitor can send messages and read the history again.
Use blocking to shut down one abusive or spammy conversation while keeping the record intact for review.
Deleting a Session
Click Delete on a row or in the session panel to remove a conversation outright. Dokko asks you to confirm, naming the session: it and its whole conversation are deleted, and this cannot be undone.
Deleting is permanent. Blocking keeps the conversation on record.
7.2 Message Logs
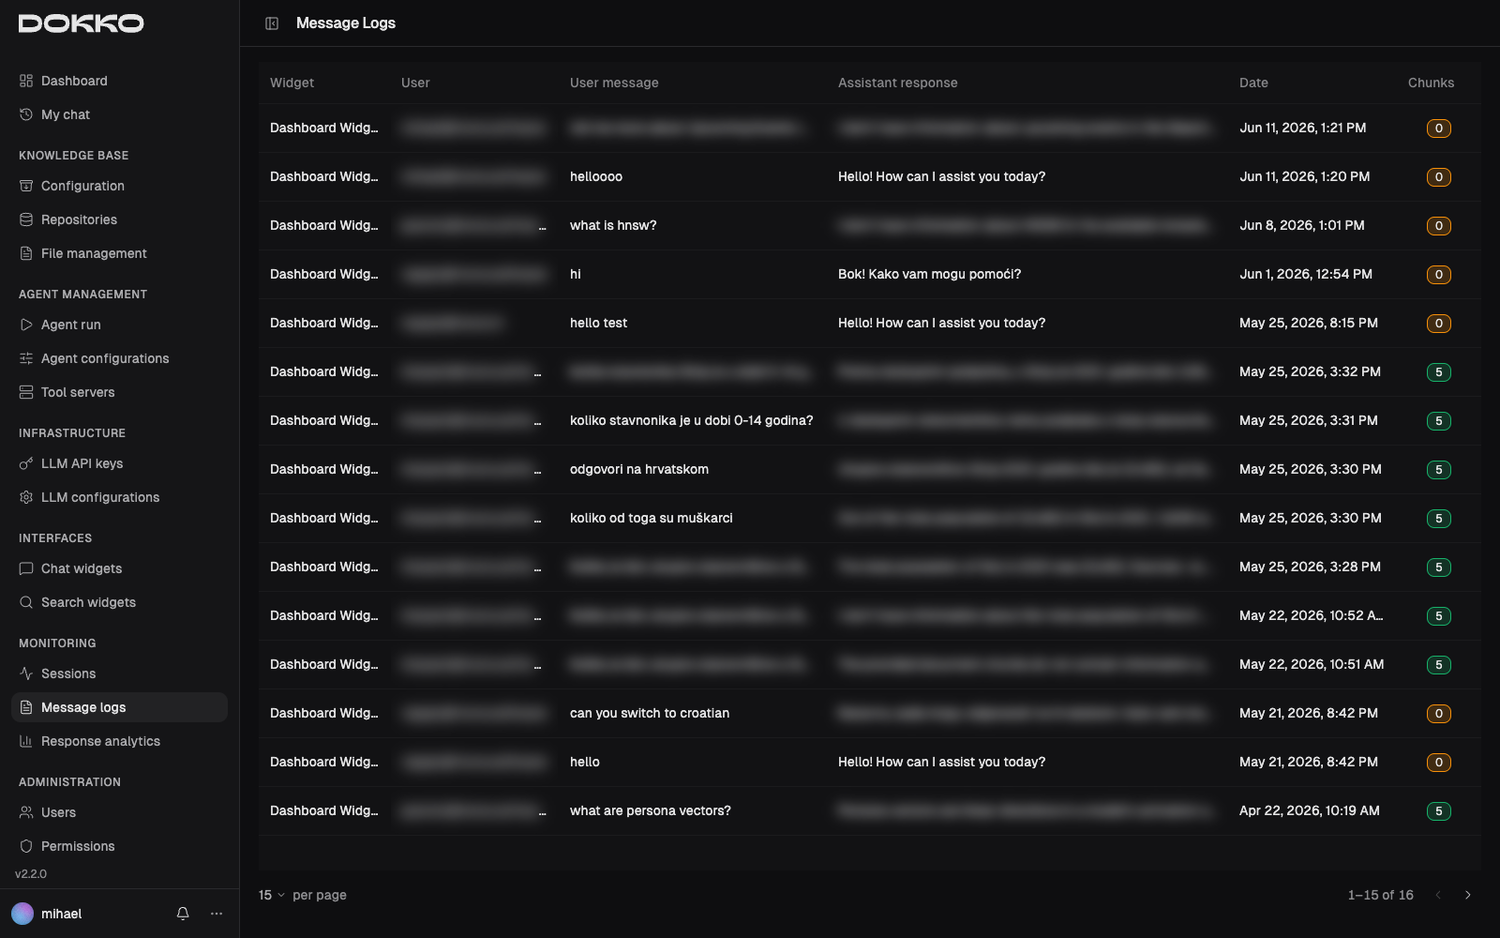
Navigate to Monitoring > Message Logs in the sidebar.
Message Logs is a full history of messages exchanged through your chat widgets. For each entry you can see the widget, the user (or “Anonymous”), the user’s message, the assistant’s response, the date, and how many document passages were used.
Click any entry to open a detail panel showing the full exchange and the exact passages (with source links) the AI drew on. Browse through the history page by page.
Use it to review what users are asking, confirm specific answers, and audit usage.
7.3 Response Analytics
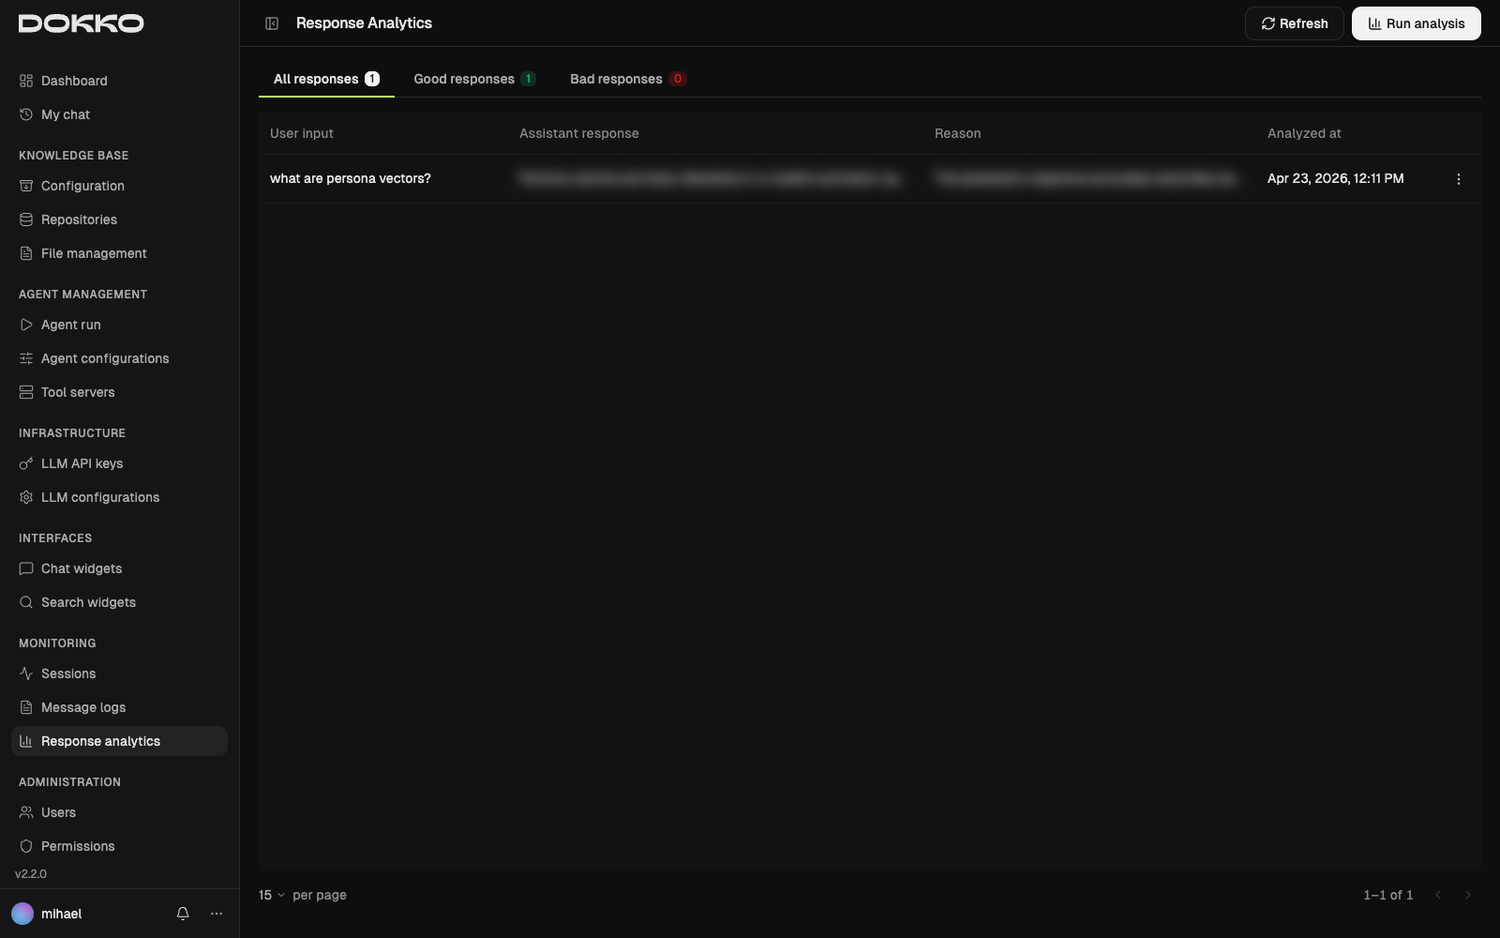
Navigate to Monitoring > Response Analytics in the sidebar.
What Is Response Analytics?
Dokko can run an automated quality scan over your past conversations. A separate AI reads through them and judges whether each response looks factually sound, flagging the weak ones along with the material that produced them. You run the scan and review the results on this one page.
Running an Analysis
- Click Run Analysis
- Choose:
- LLM Configuration: which configuration to use for the scan (this must be a configuration of type Bad Response Analysis — see Part 3.2)
- How many recent messages to analyze
- Optionally, a random sample size to spot-check rather than scan everything
- Start it. The scan runs in the background; if one is already running, Dokko tells you to wait for it to finish.
Reviewing Results
Results appear on the same page, grouped into tabs:
- All — every analyzed response
- Good — judged factually sound
- Bad — flagged as questionable
For each item you can read the original question, the AI’s response, and the reason the analysis gave for its judgment. Click an item to open a detail panel with the full exchange and the document passages used. If a flagged item isn’t useful, you can exclude it to remove it from the list.
Use this to find gaps in your knowledge base — if the AI repeatedly answers a topic poorly, add or improve documents on that topic.
Part 8: Administration — Managing Your Organization
Organization Admins manage Users and Organization settings. Content Admins can also manage Permissions.
8.1 User Management
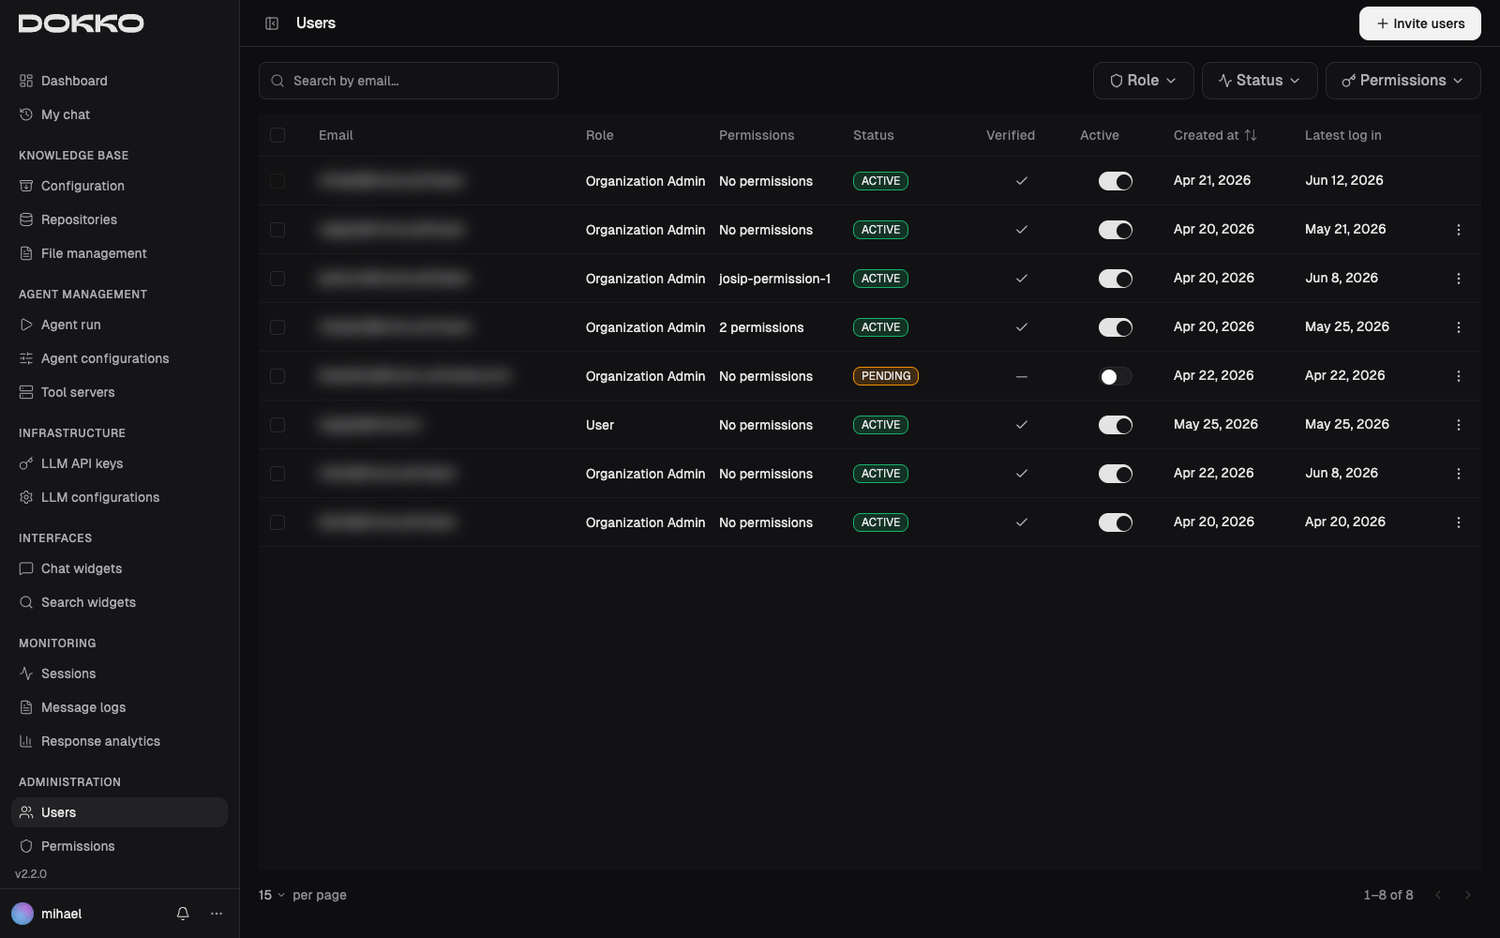
Navigate to Administration > Users in the sidebar. (Organization Admins only.)
Inviting New Users
- Click Invite Users
- Enter one or more email addresses (you can invite several at once)
- Select a Role:
- Organization Admin: full control
- Content Admin: manages documents, agents, interfaces, permissions, and monitoring
- Session Admin: monitors sessions and message logs
- User: can use chat only
- Optionally assign Permissions (which repositories they can access — see Part 8.2)
- Send the invitations
Each user receives an email with a link to set up their account.
Managing Existing Users
The Users page lists everyone with their email, role, permissions, verification, and active status. You can:
- Change a user’s role — individually, or for several users at once using the bulk action
- Activate or deactivate a user — deactivating immediately removes access while preserving the user’s data (useful when someone leaves)
- Adjust a user’s permissions
- Delete a user
8.2 Permissions
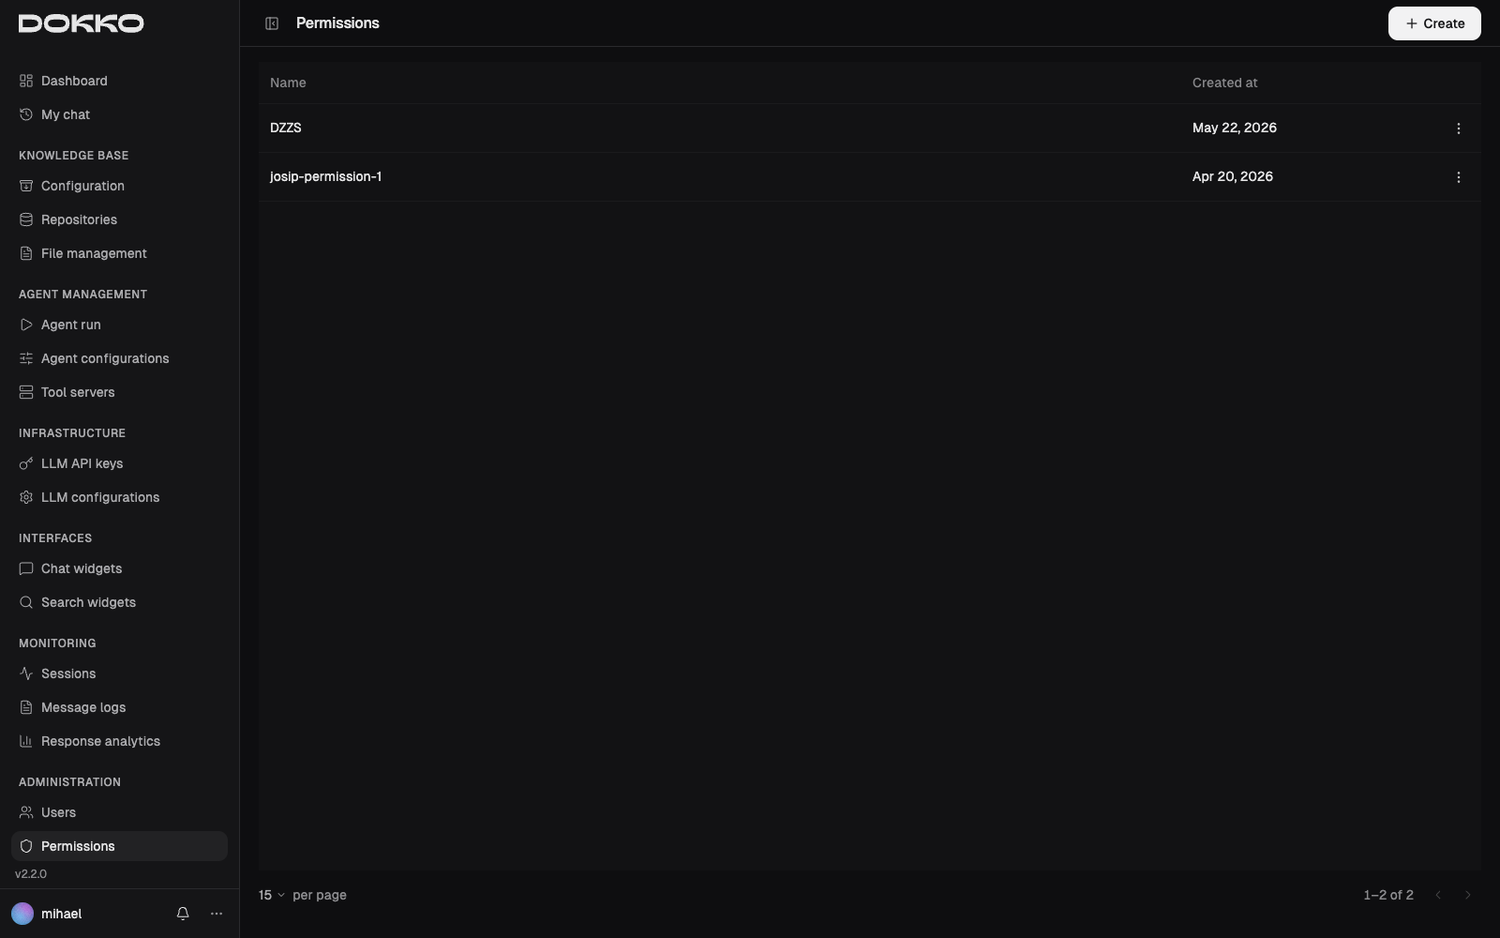
Navigate to Administration > Permissions in the sidebar. (Organization Admins and Content Admins.)
What Is a Permission?
A Permission is a named access pass. It connects two things:
- Repositories declare which permissions grant access to them (set when you create or edit a repository — Part 2.2).
- Users and chat widgets are granted permissions.
Anyone (or any widget) holding a permission can search every repository that lists that permission. This is how you keep the sales team in sales documents, HR in HR policies, and external users limited to public content.
Creating a Permission
- Click Create
- Give it a clear Name (e.g., “Sales Team Access”, “Executive Documents”, “Public Knowledge Base”)
- Click Save
Then link it to repositories (in the repository’s settings) and assign it to users (in User Management) or to a chat widget (in the widget’s settings). Users can hold several permissions and will search the combined set of repositories.
8.3 Organization Settings
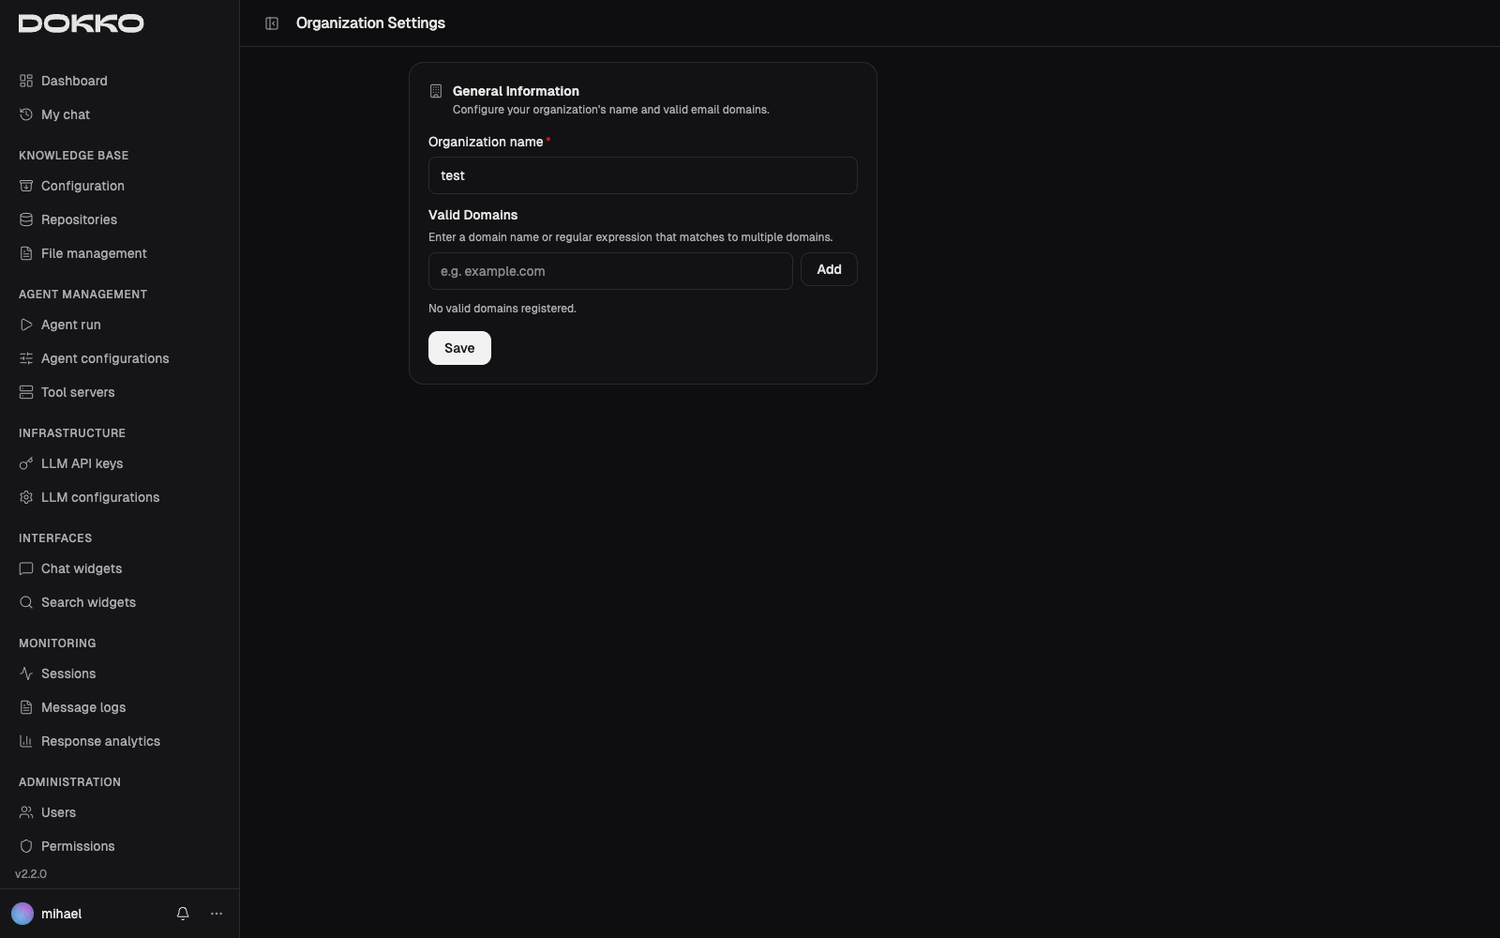
Navigate to Administration > Organization in the sidebar. (Organization Admins only.)
Here you manage your organization’s basic settings:
- Organization Name: the name shown on the login screen and throughout the platform
- Allowed Domains: restrict where your chat widget can be placed. Before integrating the chat widget on a site (for exmaple https://dokko.ai) you need to allow this domain.
After making changes, click Save.
8.4 Service Accounts — API Access for Applications
Navigate to Administration > Service Accounts in the sidebar. (Organization Admins only.)
What Is a Service Account?
Most people use Dokko through the web interface. A Service Account is different: it lets one of your own applications connect to Dokko’s API directly — no human logging in. This is how you’d, for example, have another internal system upload documents into Dokko automatically.
Instead of an email and password, a service account uses a Client ID and a Client Secret — a username-and-password pair meant for software rather than people.
What can it do today? For now, service accounts are used for file management — programmatically adding and organizing documents in your repositories. More capabilities are coming soon.
Creating a Service Account
- Click Create
- Give it a descriptive Name (e.g., “Nightly Document Sync”)
- Click Save
Dokko then shows you the Client ID and Client Secret.
Warning: The Client Secret is shown only once, right after you create it (or rotate it). Copy it and store it somewhere safe immediately — Dokko never displays it again. If you lose it, you can rotate the secret to get a new one (which also invalidates the old one).
Managing Service Accounts
The Service Accounts page lists each account with its name, client ID, and status. You can:
- Rotate the secret — issue a new secret and immediately invalidate the old one (use this if a secret may have leaked)
- Delete — permanently revoke the account’s access to the API
Note: Setting up an application to use a service account requires a developer. Hand the Client ID and Client Secret to whoever is building the integration.
Part 9: Troubleshooting & FAQ
“I can’t log in.”
Check these in order:
- Organization Name: case-sensitive and must match exactly. Ask your Organization Admin to confirm it.
- Email address: no typos, and the same address you were invited with.
- Password: use Forgot password? to reset it (you’ll need your email and organization name).
- Account not activated: if you just received an invitation, make sure you clicked the link and set your password.
- Account deactivated: contact your Organization Admin.
“The AI gives wrong or irrelevant answers.”
- Documents not added: the relevant information isn’t in Dokko yet. Ask your Content Admin to add it.
- Still processing: newly added documents take a little time to be indexed. Wait a few minutes and try again.
- Permission issue: you may not have access to the repository with the relevant documents. Ask an admin to check your permissions.
- Wrong access connected: the chat widget may not hold the permission for the right repository. Ask your Content Admin to check the widget’s settings.
- Temperature too high: if answers seem random or off-topic, the LLM configuration’s temperature may be too high. Ask your Organization Admin to lower it toward 0.
“My uploaded document isn’t being found.”
- Confirm the file is inside a repository: go to Knowledge Base > File Management, select the repository, and look for the file.
- Check the status on the Configuration page: it should reach Ready. If processing failed, the file may be corrupted, password-protected, or in an unusual format.
- Wait a few minutes: newly added files take time to be fully indexed.
“The crawler didn’t finish or failed.”
- Open the starting URL in a regular browser and confirm it loads.
- Check whether the site requires login — the crawler cannot access password-protected pages.
- Reduce the maximum depth: very large sites with high depth can time out. Try depth 2 first.
- Remember the repository is locked while a crawl runs; wait for it to finish before starting another.
“I don’t see a menu item that someone mentioned.”
This is almost always a role difference:
- Only My Chat visible → you are a User
- Knowledge Base / Agent Management visible but not Administration → you are likely a Content Admin
- Only monitoring visible → you are a Session Admin
- Everything visible → you are an Organization Admin
Note that some Infrastructure settings are view-only for Content Admins and editable only by Organization Admins. Contact your Organization Admin to check your role.
“How do I update documents that have changed?”
- For uploaded files: upload the new version to the same repository location in File Management.
- For crawled websites: run the crawl again (or rely on a recrawl schedule if one is set).
After updating, wait a few minutes for the new version to be indexed before testing the chat.
“What file types does Dokko support?”
PDF, Microsoft Word (.doc/.docx), Microsoft Excel (.xls/.xlsx), plain text, CSV, HTML pages, and Markdown. Each file must be 50 MB or smaller, and image files (such as .jpeg/.png) are not supported. For best results use text-based PDFs rather than scanned images. For scanned or visually complex documents, switch the Parsing Strategy to Foundation Model on the Knowledge Base Configuration page (Part 2.4). See Part 2.3 for the full list and limits.
“Can people outside my company use the chat widget?”
Yes. Turn Require Login off in the chat widget’s settings, and anyone with access to the widget can use it without creating an account.
“Visitors lose their chat when they close the browser.”
That is the default. Chats are kept on the visitor’s device only when you turn history on for the widget (Part 5.1) and the visitor agrees to it. Check the widget’s Chat history section:
- Keep history is set to Off → nothing is stored, chats end with the tab.
- Ask in the widget → the visitor must switch History on themselves in the chat.
- Ask on my website → your consent banner must be connected to the chat. Ask your web developer to check the Embed Code guide.
- Keep history for (days) may have passed. The count starts from the visitor’s last message.
“I see notifications — what do they mean?”
Notifications keep you informed about background activity, such as a web crawl finishing or documents finishing (or failing) processing. Open the notifications area to review them and mark them as read.
Appendix: Glossary
Abuse Protection Automatic safeguards on anonymous (no-login) chat widgets: an invisible proof-of-work check that blocks bots, and rate limits that cap how much one visitor can use the widget. It’s built in and not configurable.
Agent An AI configured to complete multi-step tasks. Unlike regular chat, an agent can use tools, search multiple sources, and execute a series of steps.
API Key A private, password-like string that grants Dokko permission to use an external AI service on your behalf. Usage is billed to the account that owns the key.
Blocked Session A conversation an admin has frozen. The visitor cannot send messages, rename the chat, delete it, or read its history, and sees it tagged Blocked in the widget. Admins keep full access, including the entire history. Each block records a reason — Spam, Abuse, or Other — and may carry an internal note; neither is shown to the visitor. Blocking affects one conversation, not the person, so the visitor can start a new chat. Unblocking clears it entirely.
Chat History A per-widget setting that decides whether a visitor’s chats are kept on their own device after they close the browser, and how the visitor agrees to it (in the widget, or through your website’s consent banner). It also sets how many days stored chats are kept. It applies only to widgets that do not require login, and it does not affect what Dokko stores for admins.
Chunking Splitting a large document into smaller pieces before indexing, so the AI can find the most relevant section rather than returning a whole document.
Crawler / Web Crawler An automated process that visits web pages, reads their content, and imports it into a repository. You provide a starting URL and it follows links to gather content.
Hybrid Search A search approach that combines keyword matching with meaning-based search, blending both for better accuracy.
Knowledge Base Your organization’s overall searchable library, built from the documents you add. When a user asks a question, Dokko searches the knowledge base for relevant passages before answering. It is set up automatically and tuned from the Configuration page.
LLM Configuration A saved recipe that selects an AI model, sets how it behaves (temperature, response length), and holds optional background instructions (the Prompt Template).
Multiple chats A per-widget setting that lets a visitor keep several separate, named chats in one chat widget and switch between them. When off, each visitor has a single chat.
Permission A named access pass. Repositories declare which permissions can access them; users and chat widgets are granted permissions. Holding a permission grants access to every repository that lists it.
Prompt Template Background instructions, set inside an LLM Configuration or an agent, that shape the AI’s behavior — persona, style, topic limits, or language. Users never see it; they only experience its effect.
RAG (Retrieval-Augmented Generation) The approach behind Dokko’s grounded answers: it first retrieves relevant passages from your documents, then writes an answer based on them. In plain English: look it up, then answer.
Reasoning A capability of some newer AI models to “think through” a question internally before answering. Set per LLM Configuration; higher levels mean more careful (but slower) answers. Only offered on models that support it.
Reranking A second-pass quality check: after the first set of candidate passages is gathered, a model re-scores them by relevance so the best material is used. Improves answer accuracy.
Repository A named collection of documents. Repositories organize your knowledge and are the unit that access (permissions) is controlled on. Each repository has a type — Semantic (for chat/Q&A) or Web Search.
Service Account A set of credentials (a Client ID and Client Secret) that lets one of your own applications connect to the Dokko API directly, without a person logging in. Currently used for file management; more capabilities coming soon.
Session One chat thread between a user and the chat interface — all the messages in a single conversation. With Multiple chats enabled, a visitor can have several (each shown as a named chat) in the same widget. Admins see these under Monitoring > Sessions.
Skill A small set of extra instructions — and optionally a one-off action — that a chat activates automatically only when the user’s question is relevant to it. Skills work on chat widgets powered by an LLM Configuration, not on agent-backed widgets.
Temperature A setting that controls how creative or predictable the AI’s responses are. 0 = very precise; higher = more varied. For factual knowledge-base chat, use a low value (0.0–0.3).
Token The unit of text AI models process. Roughly, 1 token ≈ ¾ of a word. “Max Tokens” caps the length of a response.
Tool Server An external service (MCP or OpenAPI) that gives an agent new abilities — such as querying a database, searching the web, or checking a business system.
Web Search (Grounding) An optional capability, set per LLM Configuration, that lets a chat search the open web for current information and cite the pages it used. Off by default; when set to Automatic, the AI decides per question whether to search. Currently available on OpenAI models (Google and Anthropic coming soon).
Widget An embeddable interface you add to a website with a small code snippet. Dokko offers a Chat Widget (a conversational assistant) and a Search Widget (a keyword search box).
End of Dokko User Manual
Questions or feedback? Contact your Organization Admin, or reach out to your Dokko support contact.